


SKU 93762 For technical questions, please call 1-800-444-3353. Page 15
Adjustments
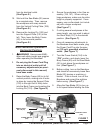
To Adjust The Stock Stop:
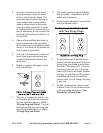
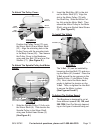
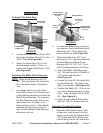
SHAFT (158)
SOCKET HEAD
SCREW (156)
STOCK
STOP
(157)
WORKPIECE
(NOT INCLUDED)
FIGURE M
1. Loosen the Socket Head Screw (156)
that holds the Stock Stop (157) to the
Shaft (158). (See Figure M.)
Adjust the Stock Stop (157) to the 2.
desired length position. Then, re-
tighten the Socket Head Screw (156).
(See Figure M.)
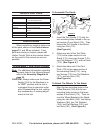
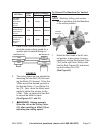
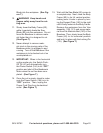
Adjusting The Blade Guide Bearings:
NOTE: Blade Guide Bearings (88, 92,
100, 104) adjustment is a critical fac-
tor in the performance of the Band-
saw.
It is always best to try a new Saw 1.
Blade (82) to see if it will correct poor
cutting before attempting to adjust the
Blade Guide Bearings. For example,
if a Saw Blade becomes dull on one
side sooner than the other, it will
begin cutting crooked. A Saw Blade
replacement will correct this prob-
lem, whereas Blade Guide Bearings
adjustment will not.
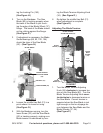
SHAFT
(91, 103)
OUTER BLADE
GUIDE BEARING
(92, 104)
INNER BLADE
GUIDE BEARING
(88, 100)
NUT (86, 96)
(NOT SHOWN)
SHAFT
(91, 103)
SAW BLADE (82)
FIGURE N
2. If a new Saw Blade does not correct
the problem, check the Blade Adjust-
able Seats (83, 110) to obtain the
proper clearance. (See Figure N.)
There should be from .000” (just 3.
touching) to .001” clearance between
the Saw Blade and Blade Guide
Bearings (88, 92, 100, 104). To ob-
tain this clearance adjust as follows:
The a. Outer Blade Guide Bearings
(92, 104) are mounted to Shafts (91,
103) and can be adjusted.
(See Figure N.)
Loosen the Nuts (86, 96) while hold-b.
ing the Shafts (91, 103) with a Hex
Key (not included). (See Figure N.)
Position the Shafts (91, 103) by turn-c.
ing it to the desired position of clear-
ance. Then, re-tighten the Nuts (86,
96). (See Figure N.)
Adjust the d. Inner Blade Guide Bear-
ings (88, 100) in the same manner.
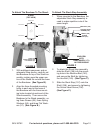
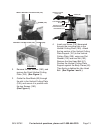
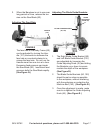
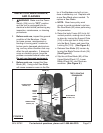
Adjusting The Blade Tracking:
Raise the Saw Head to its full verti-1.
cal position, making sure it locks in
position by turning the Support Plate
(150) to the right until it rmly locks
into the Body Frame (60) and insert-