


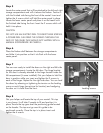

Step 5
Locate the center panel that will be attached to the left and right
storage compartments and will sit above the firebox. Position it
with the finished side facing the front of the mantel. Insert and
tighten the 4 screws which will hold the center panel in place.
Locate the lower center panel and place it on the hearth with
the finished side facing the front. Insert the 2 screws which will
hold it into place.
CAUTION
DO NOT USE AN ELECTRIC DRILL TO INSERT THESE SCREWS.
A POWER DRILL CAN DRIVE THE SCREWS THROUGH THE
FACE OF THIS PANEL THIS SHOULD NOT HAPPEN WITH A
MANUAL SCREWDRIVER. BE CAREFUL..
Step 6
Place the firebox shelf between the storage compartments
and slide it into position so that it sits flush with the lower
center panel.
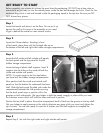
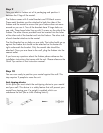
Step 7
You are now ready to install the doors on the right and left side
storage compartments. Locate the left door. The hinge bracket
for this door is already attached to the hinge located inside the
left compartment (it came installed). Get your helper to hold the
door in position while you insert and tighten the 2 screws in
each of the hinges. Repeat for the right side door. You can level
the doors by releasing or tightening the tension on the leveling
screw on each hinge (see picture for location) and realigning
the door so it is level from the front.
Step 8
Get your helper and locate the top of your mantel. This top
is very heavy. It will take 2 people to lift and position it in
place. Ensure the top goes over the positioning guide located
on the header. The top must go over this guide to be
positioned correctly. Once the top is in place insert and
tighten the 6 screws.
Leveling screws