


Installation
3A0538F 7
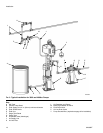
Stand Mount
Mount the pump in the accessory pump stand (B). Use
Part No. 253692 Stand for 1000, 1500, and 2000cc
Pumps (see F
IG
. 2, page 9) and Part No. 218742 Stand
for 3000 and 4000cc Pumps (see F
IG
. 3, page 10).
See Mounting Stand Hole Layouts on page 24.
Secure the stand to the floor with M19 (5/8 in.) bolts
which engage at least 152 mm (6 in.) into the concrete
floor to prevent the pump from tipping.
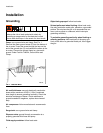
Wall Mount
1. Ensure the wall is strong enough to support the
weight of the pump assembly and accessories, fluid,
hoses, and stress caused during pump operation.
2. Ensure that the mounting location has sufficient
clearance for easy operator access.
3. Position the wall bracket at a convenient height,
ensuring that there is sufficient clearance for the
fluid suction line and for servicing the lower.
4. Drill four 7/16 in. (11 mm) holes using the bracket as
a template. Use any of the three mounting hole
groupings in the bracket. See 255143 Wall Mount
Bracket, page 25.
5. Bolt the bracket securely to the wall using bolts and
washers designed to hold in the wall’s construction.
6. Attach the pump assembly to the mounting bracket.
7. Connect air and fluid hoses.
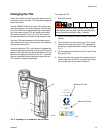
Plumbing
Install a fluid shutoff valve (D) between the mix tank (A)
and the pump.
When using a stainless steel pump, use stainless steel
plumbing to maintain a corrosion-resistant system.
Flush Before Using Equipment
The equipment was tested with lightweight oil, which is
left in the fluid passages to protect parts. To avoid con-
taminating your fluid with oil, flush the equipment with a
compatible solvent before using the equipment. See
Flushing, page 12.