


Repair
12 3A0019J
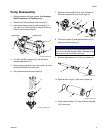
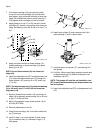
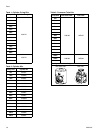
7. If the throat cartridge (18) was removed, install
o-ring (20) on throat cartridge (18) and lubricate
with grease. Apply anti-seize lubricant to throat car-
tridge (18) threads and install in outlet housing (7).
Fully tighten throat cartridge (18) with a wrench.
8. Apply grease to u-cup (17 or 26) and set in throat
cartridge (18); ensure u-cup springs face throat car-
tridge. Set bearing (16 or 25) on top of u-cup (17 or
26).
9. Apply anti-seize lubricant to throat retainer (19)
threads and place on throat cartridge (18) above
bearing (16 or 25).
NOTE: Do not thread retainer(19) into throat car-
tridge (18).
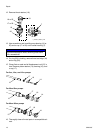
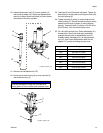
10. Install rod installation tool (RT) on displacement rod
(15). Insert the displacement rod (15) through the
throat retainer (19), bearing (16 or 25), and u-cup
(17 or 26).
NOTE: The displacement rod (15) guides the bearing
(16 or 25) and u-cup (17 or 26) into the throat car-
tridge bore (18).
11. By hand, thread throat retainer (19) into throat car-
tridge (18) to gradually press bearing (16 or 25) and
u-cup (17 or 26) into bore.
12. When fully engaged, torque throat retainer (19) to
50 ft-lbs (67.5 N•m).
13. Remove displacement rod (15).
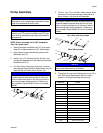
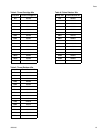
14. Clamp throat cartridge (18) in vise with outlet hous-
ing (7) facing up.
15. Install o-rings (1) on main cylinder (3) and o-rings
(2) on crossover tube (4). Lubricate o-rings (1, 2)
with grease.
16. Install main cylinder (3) and crossover tube (4) in
outlet housing (7) with a rubber mallet.
17. Lubricate piston u-cup seal (17), and bearing (16)
with grease.
18. For 60cc-160cc pumps: Apply grease to coupler end
of displacement rod (15) before installing the rod
installation tool (RT).
NOTE: The grease will hold the rod installation tool
(RT) in place while assembling the displacement rod
into the cylinder.
19. Install rod installation tool (RT) on displacement rod
(15).
19
16 or 25
17 or 26
18
20
7
r_257891_3a0019_10h
RT
15
r_257891_3a0019_15h
1
1
3
4
2
2
r_257891_3a0019_16h
4
3
7