


Installation
309911C 5
Installation
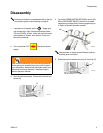
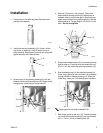
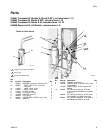
1. Place pump in vise with soft jaws. Remove brass
packing nut assembly.
2. Install new wet-cup assembly (10). Screw it all the
way down, so external o-ring (R) seats on top of
pump housing. Wrap base of wet-cup with a rag and
tighten securely with channel locks.
3. Screw pump (A) into bearing housing (H) until top
threads are level with bearing face (N). Rotate pump
to align pump outlet fitting to outlet tube (D).
TI4093a
TI4094a
R
10
TI4171a
A
D
N
H
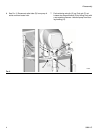
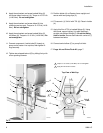
4. Wet-cup (10) has four 1/8 npt ports. Two will be
obstructed by bearing housing (H) when pump is
installed. Note or mark these ports. Remove pump.
Apply thread sealant and install plugs (3) in the two
obstructed ports. Torque plugs to 10-15 ft-lb (14-20
N•m). Do not overtighten.
5. Ensure star-shaped locknut (G) is screwed on pump
with flat side up. Carefully twist and extend the rod
(R) 2 in. (51 mm) above the wet-cup assembly (10).
6. Start threading pump (A) into bearing housing (H).
Place finger guard (9) over rod when it is accessible
through window of bearing housing (H). When pin
holes align, insert pin. Pull retaining wire clip down.
Finger guard is not used on Model E-30.
7. Seat finger guard on wet-cup (10). Continue thread-
ing pump into bearing housing (H) until top threads
are +/- 1/16 in. (2 mm) of bearing face (N).
TI4331a
10
H
3
D
3
G
R
TI4171a
A
N
H
10