


4 308791
Operation
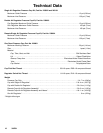
WARNING
Never exceed 20 psi (1.4 bar) static air pressure to
the cup. Exceeding the maximum working pressure
of the cup or any other system component could
cause component rupture, which could result in
serious injury and property damage.
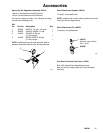
WARNING
Pressure Relief Procedure
To reduce the risk of serious injury, including splash-
ing in the eyes or on the skin, always follow this
procedure after you stop spraying, when checking or
servicing any part of the spray system, before dis-
connecting the gun, air regulator, or pressure cup
and when removing a pressure cup for refilling or
cleaning.
1. Turn off the air supply to the gun.
2. Trigger the gun into a grounded metal waste
container to relieve fluid pressure.
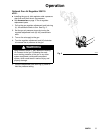
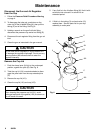
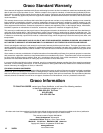
3. Place the cup on a table and slowly release the
clamp (A) to bleed-off any residual pressure in
the cup. See Fig. 4. Be sure to push the clamp
lever fully to the clamped position before turning
on the air supply to the gun again.
Setting the Cup Air Pressure
1. Pull up the cup regulator adjustment knob lock-ring
(L); this allows the knob (K) to turn. See Fig. 4.
2. Set the cup pressure at zero by turning the
adjustment knob (K) fully counterclockwise.
3. Slowly turn the adjustment knob (K) clockwise to
increase the air pressure to the cup.
4. Push the adjustment knob lock-ring (L) down to
lock the cup pressure setting.
Setting the Gun Air Pressure
NOTE: Installing the gun air inlet regulator adds a
pressure drop that could limit the air cap pressure.
Set the gun air pressure regulator for the minimum
pressure needed to atomize your fluid. See your gun
manual for recommended settings.
A
Fig. 4
L
K
M
7611A
Spraying Tips
The regulator is not self relieving so if the regulated air
pressure setting is causing excessive fluid flow, follow
these steps.
1. Pull up the cup regulator adjustment knob lock-ring
(L). See Fig. 4.
2. Turn the adjustment knob (K) counterclockwise.
3. Trigger the gun into a grounded metal waste
container until cup pressure is lowered.
4. Turn the adjustment knob (K) clockwise until you
obtain the desired lower pressure setting.
5. Push down the adjustment knob lock-ring (L).
CAUTION
Do not restrict the fluid flow by continuously spraying
with the gun’s fluid adjustment knob (M) turned in
(clockwise) as this will cause excessive abrasive
wear on the fluid needle and trigger/air valve shaft.
To restrict the fluid flow, lower the cup pressure or use
a smaller size needle/nozzle set and air cap combina-
tion.
If the cup pressure must be below 1.0 psi (0.07 bar) to
achieve the desired fluid flow, a smaller needle/nozzle
size is recommended.