


18 309303
Service
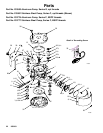
Air Valve Repair
Tools Required
D 3 mm allen wrench
D Needlenose pliers
D Retaining ring removal tool
D O-ring pick
Disassembly
NOTE: Air Valve Repair Kit 245066 is available. Parts
included in the kit are marked with a dagger, for exam-
ple (8{). Use all the parts in the kit for the best results.
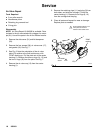
1. Remove the side cover (31) and felt dampener
(29).
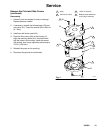
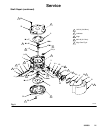
2. Remove the four screws (36), air valve cover (17),
and gasket (16). See Fig. 7.
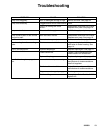
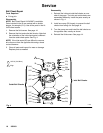
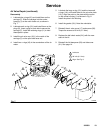
3. See Fig. 6. Note the orientation of the air valve
plate (13) relative to the fluid outlet arrow, with
“POM” marking up. Pull the plate out of the center
housing (1). Remove the three o-rings (14, 15) and
the two o–rings (43) from the plate. See Fig. 7.
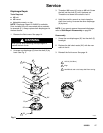
4. Remove the air valve cup (12) from the center
housing (1).
5. Remove the retaining rings (11) and plug (9) from
both sides, and slide the carriage (7) from the
center housing (1). Remove the o-rings (8, 10)
from the carriage and the plug.
6. Clean all parts and inspect for wear or damage.
Replace parts as needed.
ti15226a
Fig. 6
1
13{
1
1
Orient “POM” marking on air
valve plate as shown in
relation to fluid outlet arrow.
fluid outlet
arrow
“POM”
marking