


10 309303
Installation
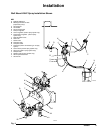
Fluid Suction Line
D Screw the suction line (L) into the pump inlet (M)
snugly. Use a compatible liquid thread sealant on
connections to prevent air from getting into the fluid
line.
D Do not pressure feed this pump.
D See the Technical Data on page 24 for maximum
suction lift.
D Use an agitator (U) to prevent fluid from settling
out. Part No. 245081 Agitator Kit (accessory) is
available.
Fluid Outlet Line
WARNING
A fluid drain valve (J) is required in your system to
relieve pressure in the hose if it is plugged. See
Fig. 2. The drain valve reduces the risk of serious
injury, including splashing in the eyes or on the
skin, or contamination from hazardous fluids when
relieving pressure. Install the valve close to the
pump fluid outlet. To use the valve as a circulation
valve, connect a tube (K) between the valve and
pail.
CAUTION
Some systems may require installation of a pressure
relief valve at the pump outlet to prevent overpres-
surization and rupture of the pump or hose.
Thermal expansion of fluid in the outlet line can
cause overpressurization. This can occur when using
long fluid lines exposed to sunlight or ambient heat,
or when pumping from a cool to a warm area (for
example, from an underground tank).
Overpressurization can also occur if the pump is
being used to feed fluid to a piston pump, and the
intake valve of the piston pump does not close,
causing fluid to back up in the outlet line.
D Use electrically conductive fluid hoses (P). Screw
the fluid fitting into the pump outlet (N) snugly.
D Install a fluid regulator (H) at the pump fluid outlet
to control fluid pressure, if desired. See Air Line,
step 1a, for another method of controlling pressure.
D Install a fluid drain valve (J) near the fluid outlet.
See the WARNING at left.
Flush the Pump Before First Use
The pump was tested in lightweight oil. If the oil could
contaminate the fluid you are pumping, flush the pump
thoroughly with a compatible solvent. Follow the steps
under Starting and Adjusting the Pump on page 11.