


12 307619
Service
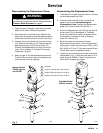
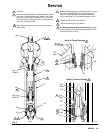
Displacement Pump Service
Disassembling
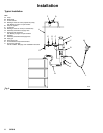
When disassembling the pump, lay out all removed
parts in sequence to make reassembling easier. Refer
to Fig. 4.
NOTE: Repair Kits and Conversion Kits are available.
Refer to the parts list for your pump (pages 14 to 17).
For the best results, use all the new parts in the kit.
Parts included in the kit are marked with one asterisk
(for example, 3*).
Clean all the parts thoroughly when disassembling.
Check them carefully for damage or wear, and replace
parts as needed.
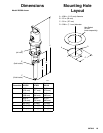
1. Remove the displacement pump from the air motor
as explained on page 11.
2. Unscrew the intake valve housing (105) from the
outlet housing (107). If it is difficult to remove,
squirt penetrating oil around the threads and gently
tap around the valve housing with a plastic
hammer to loosen it.
3. Remove the ball stop pin (113), o-ring retainer
(108), o-ring (109), ball guide (101), and ball (112).
4. Loosen the packing nut (104). Push the
displacement rod (103) down as far as possible,
and pull it out of the outlet housing (107), being
careful not to scratch the sleeve (106).
5. Secure the flats of the piston stud (102) in a vise.
Screw the displacement rod (103) off the piston
stud. Remove the ball (110), retainer (122),
packings (124, 115), and glands (117, 121).
6. Remove the packing nut (104), throat packings
(123, 114), glands (116, 118), and washer (119)
from the outlet housing (107).
7. Inspect all parts for damage. Clean all parts and
threads with a compatible solvent before
reassembling. Inspect the polished surfaces of the
displacement rod (103) and sleeve (106) for
scratches, scoring, or other damage, which can
cause premature packing wear and leaking. To
check, run a finger over the surface or hold the
part up to the light at an angle. Replace any worn
or damaged parts.
NOTE: If the sleeve (106) needs replacement and is
hard to remove, contact your Graco distributor.
Reassembling
1. Lubricate the throat packings (114*, 123*). Install
the throat packing parts in the outlet housing (107)
one at a time, in the order shown in Detail A of Fig.
4. Be sure the lips of the v-packings face down,
lubricate the packing nut threads, and install the
packing nut finger tight.
2. If you removed the sleeve (106), reinstall it in the
outlet housing (107), making sure to replace the
gasket (120). To install the gasket, lay it flat in the
outlet housing (107) and use the sleeve to seat the
gasket against the shoulder of the outlet housing.
Be sure the tapered end of the sleeve faces down,
toward the pump intake.
3. Lubricate the piston packings (115*, 124*). Install
the piston packing parts on the piston stud (102)
one at a time, in the order shown in Detail B of Fig.
4. Be sure the lips of the v-packings face up,
toward the threads of the piston stud.
4. Place the flats of the piston stud in a vise. Install
the piston ball (110*) on the piston and screw the
displacement rod (103) onto the piston valve
assembly. Torque to 35 to 40 ft-lb (47 to 54 N.m).
5. Insert the displacement rod (103) into the bottom
of the outlet housing (107), being careful not to
scratch the sleeve (106). Push the rod straight up
until it protrudes from the packing nut (104).
6. Install the ball (112*), guide (101), o-ring (109*),
retainer (108), and ball stop pin (113) in the intake
valve housing (105). Lubricate the intake valve
housing threads, and screw the intake valve
housing into the outlet housing (107). Torque to 55
to 65 ft-lb (75 to 88 N.m).
7. Reconnect the displacement pump to the air motor
as explained on page 11.