


DEH40212 Installation Instructions
3
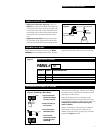
TO RELAY
RR7P RELAY SHOWN
LED INDICATOR
RELAY
CONTROL
BUTTON
POWER UP AND TEST RELAYS
1. Apply power to the power supply only. As shown in
Figure 3, to the right, press the Relay Control Button next
to each relay’s yellow plug-in termination to toggle it ON/
OFF. The relay should “click” and the LED status indicator
should change state. Confirm the operation by measuring
the continuity at the line-voltage terminations of each
relay.
2. Apply power to the relays. Being careful not to touch
any line-voltage wiring, toggle each relay ON/OFF again
and confirm that each relay controls the appropriate load.
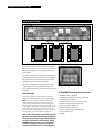
Record the circuit controlled by each relay on the RELAY
SCHEDULE which was shipped with the interior. The relays
DOCUMENT RELAY WIRING
Figure 3
associated with automation channels A-H are recorded later.
Each ProSys panel includes eight “channels” (A-H) which may
be softwired to relays within the panel. Channels are used to
group relays for common control.
When a ProSys system includes an automation module
(RCLK8PS Softwired Clock), we strongly recommend you turn
to the installation instructions for that automation module and
complete the documentation before softwiring any
relays to channels.
However, if automation is to be provided by an interface to
another system, or by using manual switches only, the
channels may be used simply for grouping relays. Follow the
instructions in Figure 5 to the left.
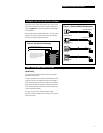
SOFTWIRING A RELAY GROUP TO A CHANNEL
RELAY # SUPPLY LOAD DESCRIPTION
-01
LP1-1 OPEN OFFICE - FIRST FLOOR NW
-02
LP1-2 "
-03
LP1-3 OPEN OFFICE - FIRST FLOOR NE
-04
LP1-4 "
-05
LP1-5 OPEN OFFICE - FIRST FLOOR SW
PROSYS RELAY SCHEDULE
Figure 4
PANEL #
01
1 Press and hold the
Channel Push Button
for several seconds.
2 Select the relays to
be controlled.
3 Press the Channel
Push Button again.
Test. Press the
Channel Push Button
to toggle the group
ON/OFF/ON.
Figure 5 – Softwiring a Relay Group
3
2
PRESS
AND
HOLD
CHANNEL
PUSH
BUTTON
FLASHING
LED
FLASHING
RED LED
HH
HH