


EnerVista PMCS 6.15 Quick Start Guide
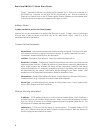
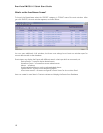
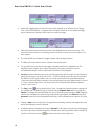
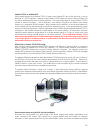
• Select the Trigger button to have the cursor times displayed as an offset from the ‘Trigger
Time’ of the COMTRADE file. A negative time indicates a time that occurs before the trigger
and a positive time indicates a time that occurs after the trigger.
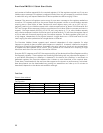
• Select the Actual button to have the cursor times displayed as an actual time stamp. The
format for the time stamp is “mm/dd/yy HH:mm:ss.ssssss” and the hours are based on a 24
hour system.
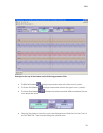
• The vertical Red line indicates the trigger position (%) of the data capture.
• The Blue and Green vertical cursors indicate initial and final time.
• The top left of the screen shows the trigger time/date as well as the playback rate. The
playback rate is related to the number of samples shown every second and can be
increased/decreased in order to improve the resolution of the playback.
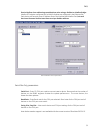
• Cursors can be moved either by clicking and dragging them left and right across the duration
period of the signal, or by using the Cursor 1, Cursor 2 scrolling bars at the top of the window.
The Red line is the Trigger position and can not be moved across the captured waveforms.
There are three time values indicated in the top right boxes listing the selected time for Cursor
1, Cursor 2 and the Delta value. The delta value is the calculated time difference between
Cursor 1 and Cursor 2.
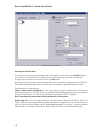
• The Play button
may be used to play Cursor 1 throughout the entire period or sections of
the waveform(s). The speed of play is controlled by the Playback Rate which is by default 1
Sample. The larger the value the faster the cursor will travel across the signal. (Note: Playback
rate can be changed on the spot during playback) During playback, the Phasors screen and
Harmonic screen will also be updated accordingly in real time based on the position of cursor
1.
• Press the Stop button to halt play. The playback automatically rewinds and repeats when the
end of oscillography record is reached.
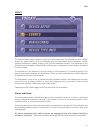
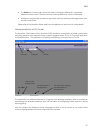
• A selected section of waveform(s) may be Zoomed in on by right mouse clicking and dragging
the outline box over the desired segment. Multiple zooms are also possible. When utilizing this
function, the Zoom Out button
becomes active for zooming back out.
16