


10 THE BASIC REVERSE OSMOSIS SYSTEM
Rev B
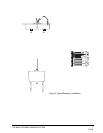
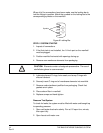
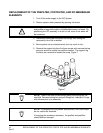
B. Assemble Faucet
The tubing and fasteners are assembled to the faucet before the
faucet is placed in position. If not using the air gap module, skip to
step #3.
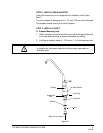
1. If the air gap feature is used, place the gasket in position on the
faucet.
2. Add the air gap module.
3. Slide the decorative ring over the tubing connections and up to the
bottom of the faucet.
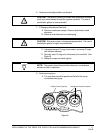
4. Slide the standoff onto the threaded tube, followed by the standard
washer and nut.
5. Screw the threaded hose connector on the end of the threaded
tube.
6. Connect the blue 3/8-inch product tubing by firmly pushing it into
the connector.
7. If using the air gap module, push the black 3/8-inch tubing onto the
small hose barb from the collar. The red 1/2-inch tubing is pushed
onto the large hose barb.
8. Put the faucet into position.
9. The horseshoe clip is positioned around the threaded pipe under
the sink and above the standoff.
10. Tighten the nut against the clip to hold the faucet in position.
STEP 4: MAKE TUBING CONNECTIONS
The connections to the faucet should be complete, the remaining
connections are:
• Feed connection—clear tubing from feed valve to white elbow
connector
• Drain connection—either red tubing from the air gap or black
tubing from grey elbow connector will attach to the drain adapter
• Permeate connection—blue tubing from faucet to blue elbow
connection
• To the flush tank (if used)
• Attach the fittings to the manifold
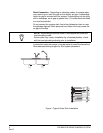
A typical connection is shown in Figure 4.