


6
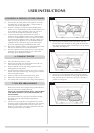
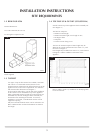
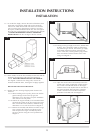
7.4 Place log D across from the rear log A to log B on the left-
hand side. There are cut-outs in both logs for location. See
diagram 5.
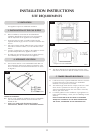
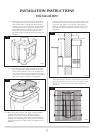
7.5 There are two ash panels which lay across the front of the
burner skin. Place the panel with the flat edge facing the left
side of the firebox. There are location holes on this log
which fit over the screw holes of the burner skin.
7.6 Place the second ash panel to the right of the first, with the
pointed end of the panel fitting into the V shape. This panel
should locate on the screw holes of the burner skin. Ensure
that both logs are horizontal to the burner ports.
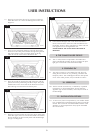
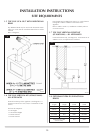
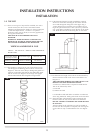
7.7 Place log E across from the rear of log A to log C on the right
hand side. Again, there are cut-outs for location. The front of
the log should sit on the front ash panels and should fit tight
to log C. See diagram 8.
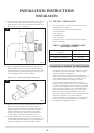
7.8 Ensure that the fibreglass seal on the back of the door is
intact, locate the door on the four studs and slide back to
the firebox. Secure in place using the four dome nuts and
tool supplied. Do not overtigthen the nuts.
NEVER OPERATE THE STOVE WHEN THE DOOR IS
REMOVED.
8.1 This is a safety feature incorporated in all GAZCO fires
which automatically switches off the gas supply if the pilot
light goes out and fails to heat the thermocouple.
9.1 The surface coating on your GAZCO fires will "burn off"
during the first 24 hour of use, producing a harmless and
temporary odour. This will disappear after the short period
of use. If the odour persists, ask your installer for advice.
10.1 The fire must be serviced every 12 months by a qualified
Gas Engineer. In all correspondence, always quote the
appliance type and serial number, which may be found on
the data badge.
11.1 To assist in any future correspondence, your installer should
have completed the commissioning sheet at the front of this
manual. This records the essential installation details of this
appliance. In all correspondence always quote the Model
No. and Serial No.
11. INSTALLATION DETAILS
10. SERVICING
9. ‘RUNNING IN’
8. THE FLAME FAILURE DEVICE
USER INSTRUCTIONS
5
AR1613
6
AR1614
7
AR1615
8
AR1616