


14
INSTALLATION INSTRUCTIONS
INSTALLATION
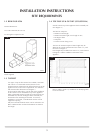
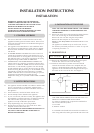
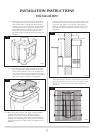
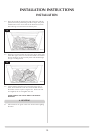
3.1.7f Remove the cast iron door using the tool provided
and carefully place to one side. Gently position the
front ceramic panel so that the side panels locate
inside the returns on the front panel. Engage the bolt
heads in the brackets on the back of the panel and
gently slide into place so that the ceramic comes to
rest on the floor. Ensure that the opening in the
panel sits centrally around the fire box opening. See
Diagram 6.
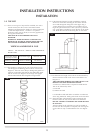
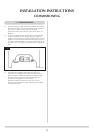
3.1.7g Place the top ceramic panel into position so that the
two spring clips slide against the inside of the side
panels. Gently position so that it sits centrally in the
outer panels. Place the cast iron grille into the recess
in the centre of the top panel and locate the blanking
plate into the grille, (if required). See Diagram 7
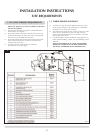
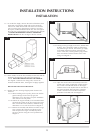
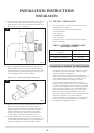
3.1.8 Before fixing the flue in the wall, apply a bead of suitable
weatherproof sealant (silicone or similar) around the
perimeter of the back face of the terminal B Diagram 8.
Feed the flue through the wall ensuring it travels smoothly.
Working from inside, engage the flue in the inner and outer
spigots, making sure the rubber seals on the spigots are not
damaged.
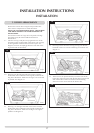
From the outside, insert the four screws in the flanges of the
flue terminal ensuring the sealant has formed a water tight
joint to the wall. Finally secure the flue to the spigot by
drilling a 3.5mm hole through the larger hole in the spigot
and insert the stainless steel screw provided; refer to C in
Diagram 8.
Any terminal which is less than 2 meters above any access
(level ground, balcony or above a flat roof to which people
have access), is to be fitted with the guard supplied, see
diagram 9.
9
AR0603
6
AR0490
8
AR0606
7
AR0492