


8
920-007-12
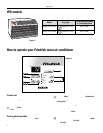
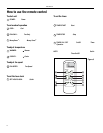
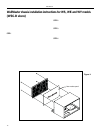
How to clean the air filter
Your Friedrich room air conditioner is equipped with a Permafoam
reusable air fi lter which is not affected by washing. The fi lter serves
to remove dust, pollen, and other impurities from the air.
KEEP THE FILTER CLEAN - A clogged, dirty fi lter will reduce the
operating effi ciency of your unit and contribute to frosting of the
indoor coil. Be sure to check the fi lter every 7 to 10 days. The fi lter
check procedure is easy, due to the unique design of the Friedrich
DECORATIVE FRONT.
FILTER ACCESS - Remove the INTAKE GRILLE from the
DECORATIVE FRONT frame by grasping it at the upper right and
left side corners. Pull out until the GRILLE is released from the upper
retaining snaps. Tilt down toward you, lift up and out of the bottom
retaining snaps. This will expose the fi lter. Remove the fi lter by pulling
it toward you. Wash the fi lter in hot, soapy water, rinse, squeeze lightly
to remove excess water, shake dry - do not twist - and replace in the
unit on the two support hangers. Replace the INTAKE GRILLE by
positioning the bottom of the GRILLE into the bottom retaining snaps.
Tilt the front up and away from you. Press in lightly on top and the
GRILLE will position itself into the upper retaining snaps.
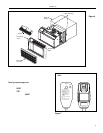
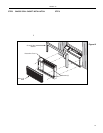
How to change airflow direction (Figure 6)
The DISCHARGE GRILLE is installed at the factory to provide 45˚
upward airfl ow into the room. (Direction 1 in Figure 6). If a vertical
airfl ow is desired (Direction 2), the direction can be changed by rotating
the DISCHARGE GRILLE.
Unplug the air conditioner.
Remove the DISCHARGE GRILLE RETAINER attached with one
screw in the right side of the grille.
Remove the DISCHARGE GRILLE from the retaining slots near the
CONTROLS, and rotate the grille as shown in Figure 6.
Reinstall the DISCHARGE GRILLE by placing it in its retaining slots.
Reattach the DIS CHARGE GRILLE RE TAIN ER with the retaining
screw. The unit is now ready to operate.
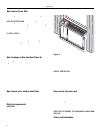
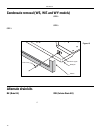
How to cover inner weather panel holes
Two beige plugs are included in the plastic bag taped to the WallMaster
chassis. These plugs may be used to cover the two holes left after
removing the inner weather panel (see Figure 6). The plugs must be
attached before the DECORATIVE FRONT frame is installed.
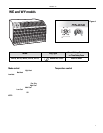
Electrical requirements
IMPORTANT: Before you begin the actual installation of your air
conditioner, check local elec tri cal codes and the information below.
Your air conditioner must be connected to a power supply with the same
AC voltage and hertz rating as marked on the nameplate located on
the chassis. Only alternating current (AC) can be used. Consult pages
3 and 7 for the correct type of receptacle for your model.
An overloaded circuit will invariably cause malfunction or failure of an
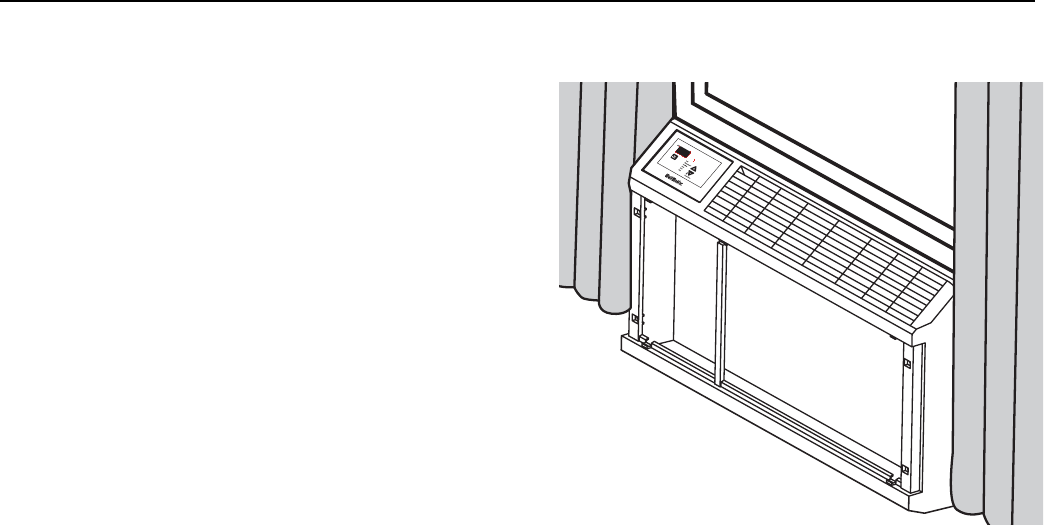
Figure 5
air conditioner, therefore, it is extremely im por tant that the electrical
power and the wiring is adequate. Consult your dealer or power
company if in doubt.
CIRCUIT PROTECTION - Before installing or relocating your
Friedrich Room Air Conditioner, check the amp rating of the circuit
breaker or "TIME-DELAY" fuse. Refer to the nameplate located on
the air conditioner chassis to de ter mine the correct fuse or circuit
breaker am per age for your model. The rating MUST NOT exceed
the value stated on the nameplate. If the air conditioner is connected
to a circuit protected by a fuse, a "TIME-DELAY" fuse must be
used due to the momentary high current demands when your air
conditioner is started.
Never use an extension cord
Your Friedrich room air conditioner is equipped with a three-prong
(grounded) plug for your protection against shock hazards and should
be plugged directly into a properly grounded three-prong receptacle.
If you have a two-prong receptacle you will need to have the circuit
replaced by a certifi ed electrician with a grounded circuit that meets
all national and local codes and ordinances. Under no circumstances
should you remove the ground prong from the plug. You must use the
three-prong plug furnished with the air conditioner.
NEVER CUT OR REMOVE THE GROUNDING PRONG FROM
THE PLUG.
Power cord information