


12
920-075-08
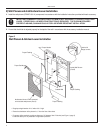
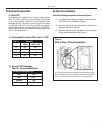
CAUTION
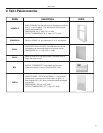
The unit basepan has three (3) provisions (left, right, and
rear) for connecting an external condensate drain.
A fi eld supplied condensate drain system must be
connected to one of the three (left, right, or rear) 3/4"
FPT connections on the unit basepan. Use of rear fi tting
may result in staining of the outside wall.
The remaining two connections must be plugged using
the two 3/4" pipe plugs (provided) and fi eld supplied
tefl on tape or pipe joint compound.
The addition of a secondary drain pan may be required.
Follow all applicable codes.
Failure to follow these procedures may result in serious
property damage.
A fi eld supplied secondary condensate pan may be
applied. Check with local codes.
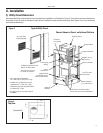
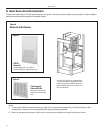
7) Chassis Final Connections
With the chassis in place, you are now ready to begin chassis
connections:
A. Move the thermostat switches to "OFF" and "AUTO." This
will keep the ther mo stat from cy cling the chassis until fi nal
connections are com plete.
B. Connect the ductwork onto the 10" collar. Plas tic wireties (fi eld
sup plied) are suggested to se cure the ductwork in place. Use
2 wire ties, one for each inner and outer fl ex duct sleeve.
C. Using the two 3/4" plugs supplied with the unit, plug two of
the condensate drain holes. Connect a drain to the third
condensate exit location. Be sure to use tefl on tape or
approved pipe sealant on all drain connections and plugs.
(See Figure 10.)
D. For 208 Volt pow er only: you must move the trans form er wire
as shown in Fig ure 7, Page 9.
E. Review the Fi nal Installation Check list on Page 12 before
re plac ing the pow er quick dis con nect, reconnecting power
to the chassis, plug ging in the re mote ther mo stat har ness, or
op er at ing the chassis.
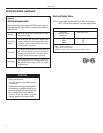
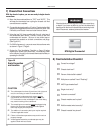
8) Final Installation Checklist
Correct line voltage?
Chassis deck level?
Plenum divider baffl e installed?
Wall plenum caulked? Level? Flashing?
HACR type breaker/fuse?
Single circuit only?
Ductwork connected?
Chassis weather seal in place?
Wall thermostat wired correctly?
Chassis inserted into plenum?
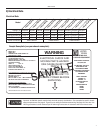
Electrical shock and moving parts hazard can cause injury
or death. If you have not done so, pull out the disconnect
head found on the front of chas sis before continuing instal-
lation! Disconnect external power at the breaker.
Drain Connection
and Location
Figure 10
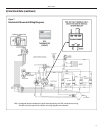
RT4 Digital Thermostat
8
7
/
8
"
7
1
/
8
3"
17 x 2
1
/
8