


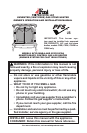


www.fmiproducts.com
113084-01L 9
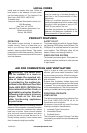
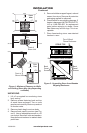
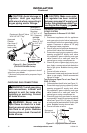
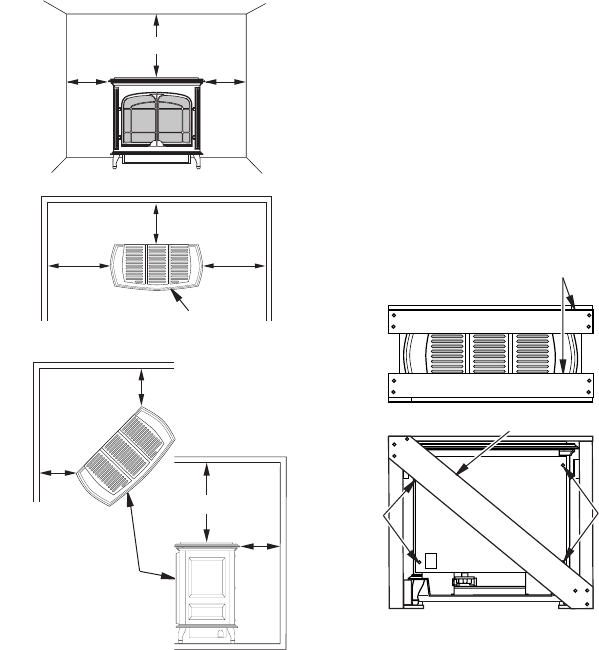
6"
Minimum
48"
Minimum
Ceiling
Floor
Back
Wall
INSTALLATION
Continued
Figure 4 - Minimum Clearance to Walls
and Ceiling (Stove May Vary Depending
on Model)
Side
View
12"
Minimum
12"
Minimum
48"
Minimum
Ceiling
Side
Wall
Side
Wall
Back Wall
Side Wall Side Wall
12 "
Minimum
12 "
Minimum
6 "
Minimum
Corner
Wall
Wall
6 "
Minimum
6 "
Minimum
Front of
Stove Unit
Front
View
Front of
Stove Unit
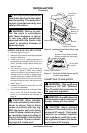
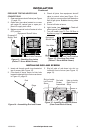
Figure 5 - Unpacking Stove from Wooden
Shipping Enclosure
Back
Panel
Screws
STOVE TOP
Top of Wood
Frame Enclosure
Back of Wood Frame Enclosure
Back
Panel
Screws
1. Lift off corrugated box enclosing stove
body crating.
2. Remove screws fastening back and top
of wood frame enclosure. Two or more
people must carefully lift stove up and out
of wooden crate.
3. Remove plastic bag from stove body.
4. Remove back panel from stove (see Fig-
ure 5). Use an adjustable wrench or a 10
mm socket. Remove 4 bolts and washers.
Keep bolts and washers to reattach back
panel later.
5. Remove bubble-wrapped log set, rod and
screen from stove. Remove all protective
packaging applied for shipment.
6. Check heater for any shipping damage. If
heater is damaged call FMI PRODUCTS,
LLC at 1-866-328-4537 for replacement
parts before returning to dealer. Some
ber akes may fall from logs. This is ac-
ceptable.
7. Place freestanding stove near desired
location in room.