


www.fmiproducts.com
124386-01A12
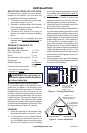
FIREBRICK WALL INSTALLATION
Continued
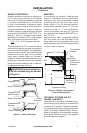
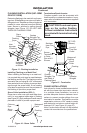
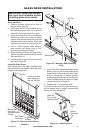
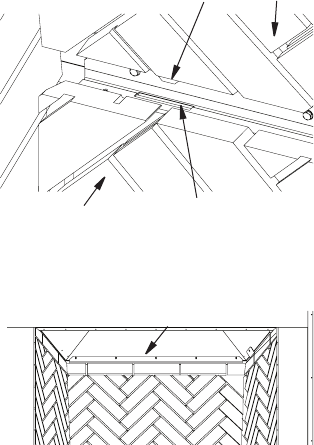
Figure 24 - Installing Top Rear Wall
Retaining
Bracket
5. Install the rear top rebrick wall. Lift the
panel up with the front of the rebrick wall
facing toward the front of the replace.
The bottom of the panel has two tabs
that slide into the bracket on the top of
the bottom rear panel (Figure 23). Secure
the top of the rebrick wall with the rear
retaining bracket provided. The bracket
will slip underneath the metal lip on the
top of the rebrick wall and screw into the
inner dome of the replace (Figure 24).
6. It is recommended that the joints between
all rebrick walls be grouted for a more
nished look. For grouting instructions.
For more information and to watch a how to
video go to www.fmiproducts.com and select
Technical Support.
GROUTING INSTRUCTIONS
Material provided:
Bag of cement
Bag of sand
Material required:
Piping bag
Joints striker
Heavy duty mixing bucket
Sponge or Wet Cloth
1. Moisten brick surface with damp sponge
or spray bottle just prior to application.
When bricks are wet, any excess grout
mixture on bricks will easily wipe off.
2. In a heavy duty mixing bucket, add equal
parts cement and sand. Add enough water
and mix together well using a power drill
with mixing wand attachment to a yogurt
like consistency. Not adding enough water
can lead to grout falling out after burning.
3. The overall length of piping bag should be
about 16". If the bag is longer than 16",
cut it down to size by removing end with
larger opening. This will make the bag
easier to handle.
4. Put grout mixture into piping bag making
sure the smaller opening is downward and
over a moist towel to avoid spilling. Place
a wet towel over the bucket making sure it
is directly on the surface of grout mixture.
This will keep the mixture moist and it will
not dry out before use.
5. Grout all joints where two rebrick walls
come together.
6. Using a trowel, remove excess grout mix-
ture by moving trowel in the direction of
the joint. Grout mixture in the joint should
now be ush with brick surface. If not
enough grout is applied into each space,
grout may fall out after burning.
7. Using a joint striker, smooth out grout line.
Allow 72 hours before
operating replace.
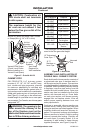
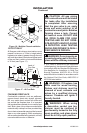
Figure 23 - Installing Top Rear Wall
Tab
Top
Rear
Bottom
Rear
Slot