


Assembly instructions
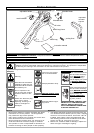
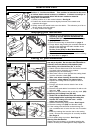
Fitting the Handle Bolt (G)
1. Place handle bolt into the location slot on the
product and slide into place.(G).
2. Repeat on the other side.
Fitting the Handle (H)
1. Locate handle onto handle bolts on each side of
the product.
2. Secure handle by turning handle knobs clockwise.
(H)
3. The handle can be adjusted by turning handle
knobs 3 full turns anti-clockwise, moving handle
to position required and re-securing handle as
described in 2.
Fitting The Shoulder Harness (J) & (K).
1. Thread strap through the slots in the handle.(J)
2. Thread strap through the buckle. See fig J. Adjust
as required to ensure the shoulder harness is in the
most comfortable position. See fig. K.
J
K
G
H
Buckle
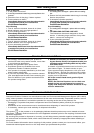
How to Use
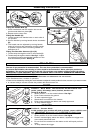
BLOW
Position 1 - Blow Mode The Gardenvac will blow debris from
patios, paths, driveways, lawns, bushes, borders etc.
Using As A Blower
1. Select position 1 on the mode indicator. See fig L.
2. Point nozzle towards the ground.
3. To start squeeze trigger.
4. Stand back from debris to be cleared.
5. Point nozzle towards the debris and slowly approach.
6. To stop release trigger.
WARNING
The use of eye protection is recommended. The use of ear protection is recommended.
To prevent dust irritation, the wearing of a face-mask is recommended. Never point your product at
bystanders. Do not use your product in the rain. Do not leave your product outdoors while it is raining.
IMPOR
TANT!: YOUR PRODUCT WILL NOT OPERATE UNTIL THE FULLY ASSEMBLED DEBRIS BAG
AND FRAME ARE PROPERLY FITTED.
BEFORE USE: E
NSURE THERE ARE
NO GAPS
BETWEEN THE DEBRIS BAG AND THE PRODUCT
.
• The Gardenvac has 3 modes of operation.
• These can be selected by moving the mode indicator to adjust the nozzle position for blow, vacuum or jet vacuum mode.
• In vacuum and jet vacuum modes the product will shred leaves etc.
L
VACUUM
Position 2 - Vacuum Mode
In this position your product will pick up leaves, paper, rubbish, cans
etc. IMPOR
TANT: R
EMOVE
N
YLON
L
INE
BEFORE V
ACUUMING
C
ANS
Using As A Vacuum
1. Select position 2 on the mode indicator. See fig M.
2. Position nozzle slightly above the debris, squeeze the trigger and
move slowly back and forth.
3. Do not force the nozzle into the debris as this will impair perform-
ance.
4. To stop release the trigger.
M