


Assembly Instructions
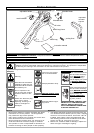
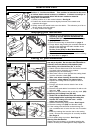
To Fit Assembled Debris Bag To Product (E)
• Switch off and disconnect from the mains
electricity supply BEFORE REMOVING OR
REPLACING the fully assembled debris bag.
• The cutting head and cutting line continue to
rotate after your Gardenvac has been
switched off.
IMPOR
TANT: Do not squeeze the trigger when
fitting the debris bag (E1)
1. Ensure debris fin is horizontal (E2) as illustrated
in fig E.
2. Locate bag frame into clip on the underside of
product. (E3).
3. Lift handle towards product until bag latch
locates and click into place. (E4)
To Remove Debris Bag From Product (F)
1. Gently press bag latch (F1) down. See fig F.
2. Lower handle of bag frame away from product.
3. Move bag frame forward.
1
2
E
2
1
4
3
2
debris fin
F
1
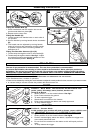
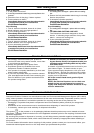
To Attach Debris Bag to Bag Frame
With bag frame on the ground:-
1. Fit first two holes on the plastic trim of the debris
bag to the first two location points on the front of
the bag frame (where debris fin is attached). (A)
2. Fit next hole on the plastic trim to next location
point on bag frame. (B)
3. ...until all holes on the plastic trim of the debris
bag are securely located to bag frame. (C)
• ENSURE THE DEBRIS BAG IS FITTED
SECURELY TO THE BAG FRAME.
To Fit the Cutting Line to the Cutting Head (D)
• Switch off and disconnect from the mains
electricity supply BEFORE
removing or fitting
the cutting line.
• Handle the cutting line with care - sharp
edges can cause injury.
1. Place the cutting line into the slot in the cutting head
and click into place as illustrated in Figure D.
• Ensure the cutting line is correctly located.
•O
NLY USE CUTTING LINESPECIFIED FOR THIS PRODUCT
.
S
EE
P
RODUCT
R
ATING
L
ABEL FOR MODEL DETAILS
D
A C
B