


Installation Parts Kit contents:
3
WINDOW INSTALLATON
INSTALLATION
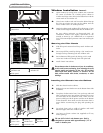
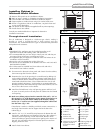
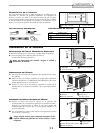
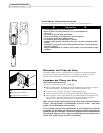
Decorative Front Removal
1. Remove the 3/8” phillips screws on either side of the cabinet.
2. Gently pull forward while grasping both sides of the decorative front.
Removing the Chassis
1. Remove the two (2) shipping screws from the rear bottom side of the
cabinet. These shipping screws may be discarded.
2. Remove the two (2) anti-theft screws from the bottom front sides of
the cabinet. RETAIN THESE SCREWS, they will be replaced later in
the installation.
3. Slide the chassis out of the cabinet by grasping the base pan handle
and pulling forward while bracing the top bar.
Tools Needed
23 7/8” to 41 5/8”
Screwdrivers
Ratchet or Driver with 1/4” socket
Tape Measure
Carpenter’s Level
A
B
C
A
A
D
A
B
C
D
E
E
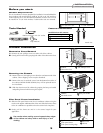
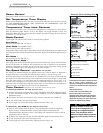
Window Requirements:
This air conditioner is factory prepared for installation in standard double-
hung windows with actual opening width of 26 7/8” to 41 5/8” and clear,
vertical opening of 15 5/8” minimum from bottom of sash to sill. Unit can
be installed in 23 7/8” wide window, if cabinet side seals are removed.
Cabinet
Decorative front
3/8” Phillips screw
A
B
B
A
B
B
C
C
C
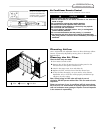
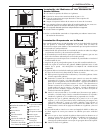
Top Bar
Filler panel frame
Filler panel locking edge
A
B
C
Filler Panel Frame Installation
1. Slide the filler panel frame onto the air conditioner cabinet using the
tracks on the top bar and bottom bar of the unit. Slide the frame as close
to the air conditioner as possible so that the curtain locks into place.
2. Gently pull the frame out until it is the correct length for your
application.
Use caution when working around exposed sharp edges
of the cabinet and sharp coils to avoid injury or torn
clothing.
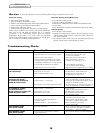
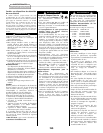
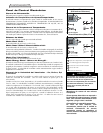
Fastener Identification
Actual size
Item
Description
1” wood screw
5/8” wood screw
Qty
1
5
A
B
A B
15 5/8” minimum
Shipping screws
Cabinet
Anti-theft screws
Chassis
Base pan handle
A
B
C
D
E
Bottom bar
Cabinet
D
E
Before you start:
Window Installation