


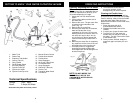
OPERATING INSTRUCTIONS
1. Add 3 cups, (24 oz) of water to the
tank.
2. Insert plug into electrical outlet.
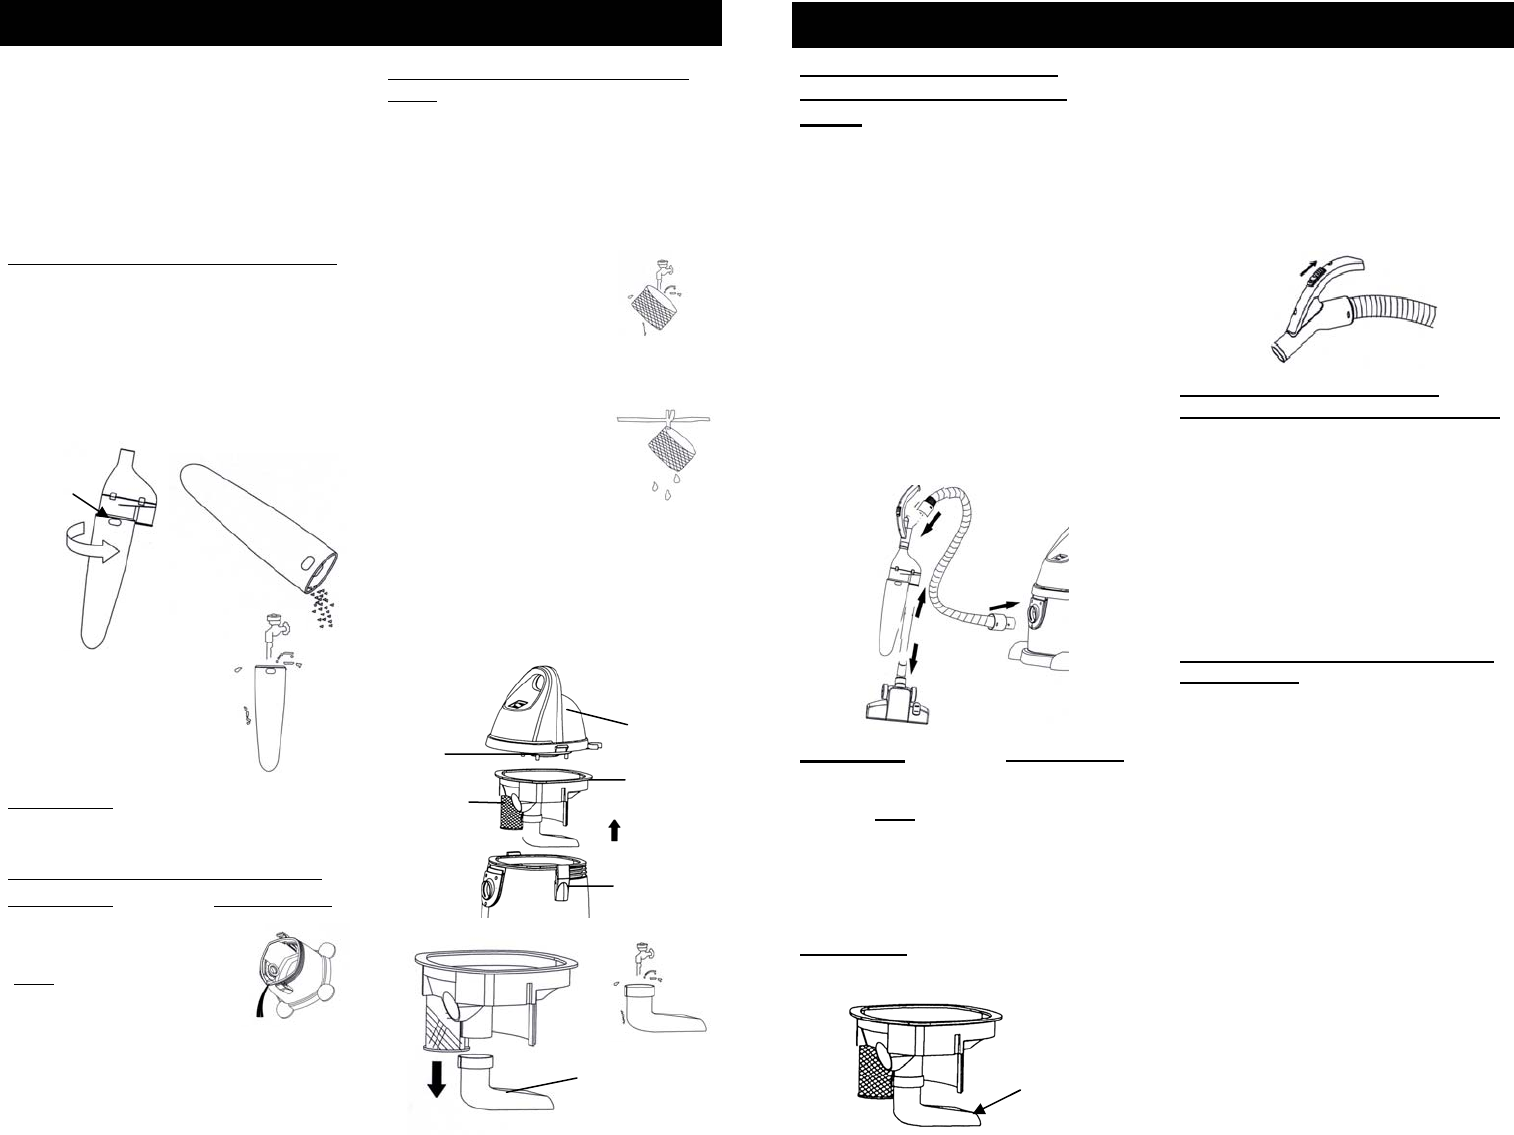
3. To connect the flexible hose into
the air intake duct, align the arrow
on the hose with the arrow on the
unit. Push in and turn 90°
clockwise to lock the hose in
place. (Fig. 1)
4. Attach the flexible hose to the
cyclonic tube. (Fig. 1)
5. Push extension tube into the
cyclonic air intake opening and
attach desired accessory to the
other end. (Fig. 1)
NOTE:
3
Always remove the power plug
from the wall outlet before assembling or
removing accessories and/or filling or
emptying the water tank.
WARNING: Water level MUST NEVER
exceed the "Max" level indicated on the
water tank. Empty tank when water level
reaches "
MAX" indicator. If water is seen
to be coming from the exhaust -
immediately turn the unit off and unplug
from electrical outlet. Empty water tank
and clean. Refill water tank with 3 cups
(24 oz.) of clean water then plug unit
back in and continue working.
IMPORTANT: DO NOT operate this
vacuum when water level is below the
water tube opening.
Fig. 1
Using Your Water Filtration
Vacuum For Dry Vacuuming
6. Turn the "On/Off" Switch to the "On"
position.
7. The flexible hose is equipped with a
manual suction control to adjust the
amount of suction required. For strong
suction ensure that suction button is
closed. To decrease amount of
suction slide the button to open until
desired strength is obtained. (Fig. 3)
Fig. 3
To Use the Dry Vac Feature
Without the Cyclonic Attachment:
8. Attach the wider end of one of the
extension tubes to the flexible hose
handle.
9. Attach the other extension tube to
the first one and ensure a tight
connection.
10.Attach the desired accessory to the
narrow end of the extension tube.
11.When finished using the unit,
unplug from electrical outlet and
empty the water from the unit.
Accessories for Use With the Dry
Vac Feature:
• Air Driven Turbo Brush
• Convertible Brush
• Crevice Tool
• Floor Brush
• Cyclonic Attachment
Air intake
duct
Cyclonic
attachment
Extension
tube
Accessory
Manual
Suction
Control
Fig. 2
Water Tube
OPERATING INSTRUCTIONS
6
Fig. 7
Fig. 9
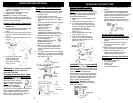
5. Dust cup may be rinsed
under lukewarm tap
water. Ensure that
dust cup is dry before
using. (Fig. 9)
Emptying & Cleaning Water Tank
WARNING: Water level MUST NEVER
exceed the "Max" level indicated on the
water tank. Empty the tank
when the water level reaches
"
MAX" indicator. If water is
seen to be coming from
the exhaust - immediately
turn the unit off and unplug from electrical
outlet. Empty the water tank and clean.
(Fig. 10) Refill water tank with clean
water to min. 3 cup level, then plug unit
back in and continue working.
WARNING: To reduce risk of electric
shock - unplug before cleaning or
Cleaning / Replacing Foam Inlet
emptying water tank.
Filter
1. Unplug unit from electrical wall outlet.
2. Lift the locking tabs on either side of
the water tank.
3. Lift the handle to remove the
removable cover. (Fig. 11) Empty the
water tank into a toilet or an outside
drain.
4. The foam inlet filter should be cleaned
regularly depending on
amount of usage.
Carefully remove the
foam inlet filter.
A severely soiled or
clogged filter should be thoroughly
washed with fresh tepid water. A mild
detergent may be used if required.
5. Let the foam inlet filter
air dry completely
before replacing in vacuum.
Do not use a washing
machine to rinse the
filter. Do not use a hair dryer to dry
it. Air dry only. Never operate the
vacuum without the foam inlet filter
in place.
6. The water tube may become clogged
with debris. Pull away from removable
cover and rinse under lukewarm water
and replace. (Fig. 12)
Fig. 12
Water Tube
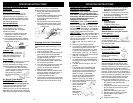
Cleaning The Cyclonic Attachment
1. Do not allow dirt to go above the
“MAX” level.
2. Remove the cyclonic attachment from
flexible hose and any extension
tubes.
3. Hold cyclonic dust cup firmly and turn
the cover counter clockwise to unlock.
(Fig.7)
4. Firmly pull apart and empty dust cup.
(Fig. 8)
Fig. 8
Cover
Removable
Cover
Canister
Locking
Tabs
Fig.11
Foam Inlet
Filter
Pre-motor
Filter
Water Tube
Dust Cup
Lock
7. If you still see that the pre-cleaner has
not been completely removed, repeat
steps 3 and 4 again.
8. If the stain has not been removed,
repeat steps 1 to 6 again.
NOTE: Pre-cleaner spot removers
sometimes do not remove tough stains.
Please use a professional carpet cleaning
service if such is the case.
Fig. 10