


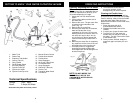
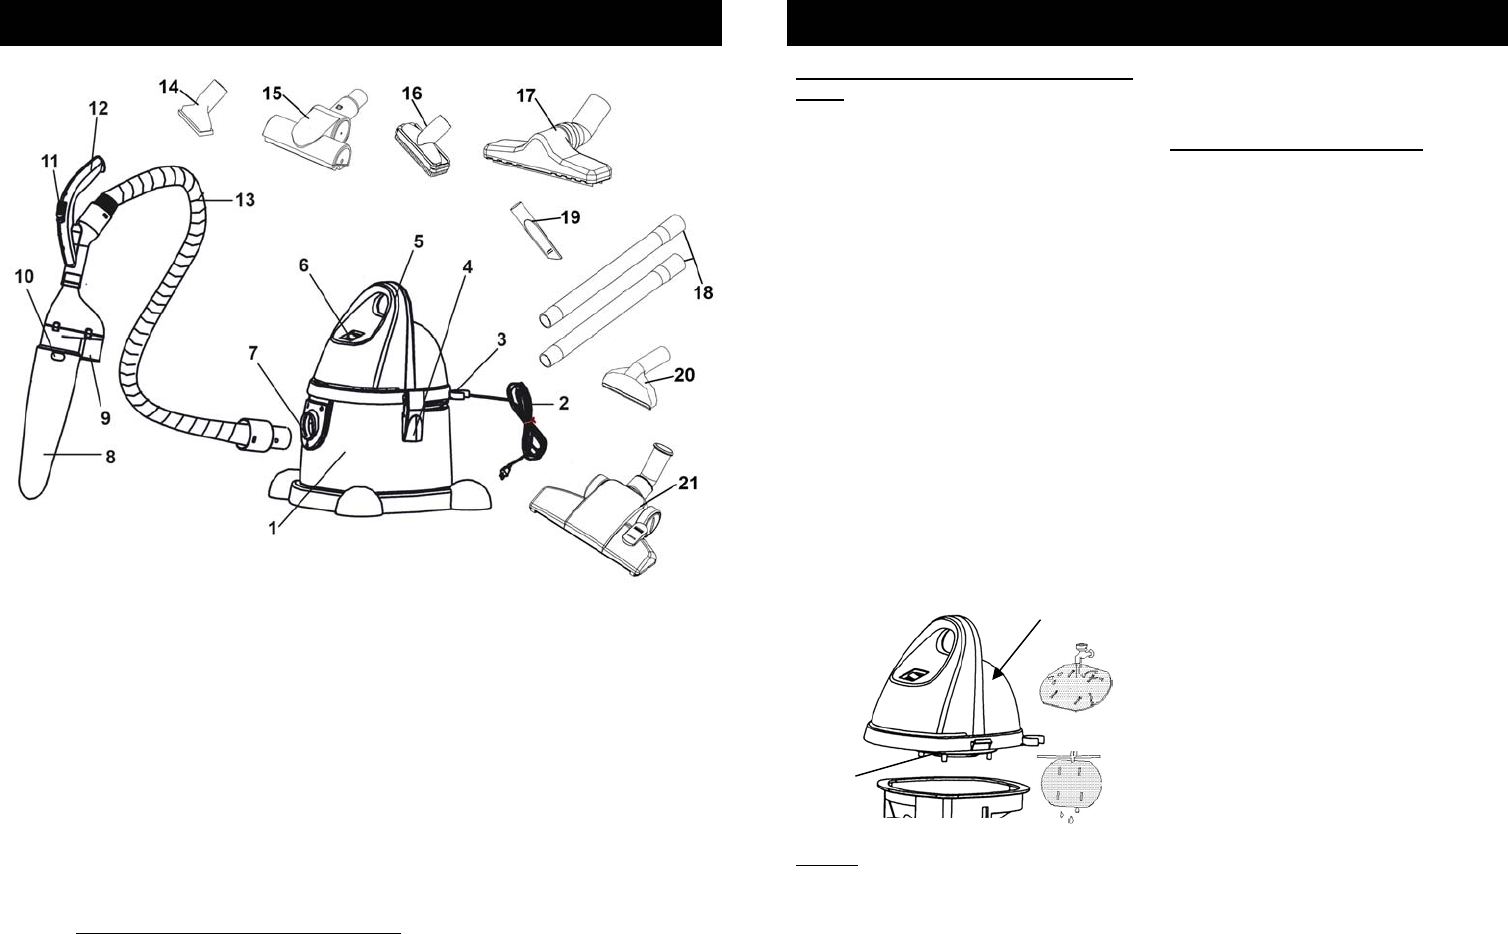
GETTING TO KNOW YOUR WATER FILTRATION VACUUM
Technical Specifications
Voltage: 120V., 60Hz.
Power: 5 Amps, 600 Watts
2
* Illustrations may differ from actual product.
1. Water Tank
2. Power Cord
3. Extension Tube Holder
4. Locking Tab (x2)
5. Carry Handle
6. On/Off Power Switch
7. Air Intake Opening
8. Cyclonic Dust Cup
9. Cyclonic Air Intake
10. Cyclonic Dust Cup Lock
11. Manual Suction Control
12. Flexible Hose Handle
13. Flexible Hose
14. Small Squeegee
15. Air Driven Turbo Brush
16. Convertible Brush
17. Large Squeegee
18. Extension Tubes (x2)
19. Crevice Tool
20. Triangular Water Brush
21. Floor Brush
Cleaning / Replacing the Pre- Motor
Filter
The pre-motor filter is a washable filter but
should be replaced every three (3) to six
(6) months depending on usage.
1. Unplug the unit from electrical wall
outlet.
2. Lift the locking tabs on either side of
the water tank.
3. Remove the cover. The pre-motor filter
is located on the underside of the
cover. (Fig. 13)
4. Remove the pre-motor filter.
5. Rinse the pre-motor filter in lukewarm
water and let the filter air dry
completely for 24 hours. Do not use a
washing machine to rinse the filter. Do
not use a hair dryer to dry it. Air dry
only for 24 hours. Never operate the
vacuum without the pre-motor filter in
place.
6. When the pre-motor filter is completely
dry, replace it into the cover of the unit
and replace the cover onto the unit.
7. A severely soiled or clogged filter
should be thoroughly washed with
fresh tepid water. A mild detergent can
be used if required.
OPERATING INSTRUCTIONS
7
9. The water tube should also be
thoroughly washed. A mild
detergent may be used if required.
NOTE: DO NOT IMERSE THE
ELECTRICAL PART OF THE
VACUUM INTO WATER OR ANY
OTHER LIQUID.
Pre-Motor
Filter
Fig. 13
Cover
Cleaning the Flexible Hose
When using the flexible hose for picking
up liquids or other soft foods such as baby
foods or ketchup, always rinse the flexible
hose with warm water after each use
before the dirt hardens on the inside of the
flexible hose.
1. Empty the water tank of all
accumulated water and dirt.
2. Reattach the flexible hose to the
canister.
3. In a pail, pour 3 cups of warm water.
4. Turn the unit “On” and insert the
flexible hose into the pail to suck up
the water. This will rinse out the inside
of the flexible hose.
5. Once you have finished, empty the
water tank again and store your unit
away.