


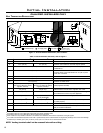

Operating Instructions
FOR YOUR SAFETY READ COMPLETELY BEFORE OPERATING.
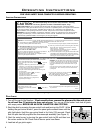
LIGHTING INSTRUCTIONS:
6
CAUTION:
Hot while operating. Do not touch. Keep children, clothing,
furniture, gasoline or other flammable vapors away.
FOR YOUR SAFETY: Do not operate this fireplace with the glass removed, cracked or broken.
Replacement of this glass should be done by a licensed or qualified person! This appliance needs fresh
air for safe operation and must be installed with provisions for combustion and ventilation air.
See installation and operating instructions manual. Keep burner and control compartment clean .
Improper installation, adjustment, alteration, service or maintenance can cause property
damage, personal injury, or loss of life. Refer to owners manual. Installation and service must be
performed by qualified installer, service agency or the gas supplier.
WARNING:
TO TURN OFF GAS TO APPLIANCE
1.
2.
Flip burner switch to “OFF”
Turn the gascontrol knob clockwise to the “OF F”
position
3. Turn off all electrical power to the applianceif service isto
be performed.
ACLIE-1
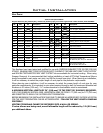
FOR YOUR SAFETY READ BEFORE OPERATING
WARNING: IF YOU DO NOTFOLLOW THESE INSTRUCTIONS EXACTLY,AFIREOR EXPLOSIONMAY RESULT CAUSING
PROPERTY DAMAGE, PERSONAL INJURY OR LOSS OF LIFE.
A)
B) BEFORE LIGHTING
WHATTO DOIF YOU SMELL GAS:
This applianceis equippedwith a pilot, whichmustbe litby
hand
smell all around theappliance area
for gas
Do not try tolight any appliance. Do not touch any electrical
switch:
Immediately call your gas supplier from a neighbors phone.
Follow
byfollowing these instructions exactly.
and next to the floor because some gas is heavier
than air and will settle on the floor.
donot use any phone in yourbuilding.
the gas suppliersinstructions.
If youcannot reach yourgas supplier, call the firedepartment.
Use onlyyour hand to pushin orturn the gascontrol knob,
Call a qualified service technician. Force or
Donotuse thisappliance if any part hasbeenunder water.
C)
D)
Never use tools. If the knob will not push in or turnby
hand, donot try to repair it.
attempted
repair may result in afire or explosion.
Immediately call a qualifiedservice technician to inspect
the appliance and toreplace anypart of the controlsystem
and anygas controlwhichhas been under water.
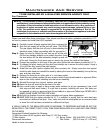
LIGHTING INSTRUCTIONS
1.
2.
3.
4.
5.
STOP! Readthe safety information above on this label.
Turn off all electrical power to this appliance.
Turn off the gas control knob clockwise to the off
position.
Open door. Wait five (5) minutes to clear outany gas.
Close door.
If youdo not smell gas goto the next step
Find pilot-located tothe right behind the side log. Turn
the gascontrol
If you smell gas, including near the floor ,
STOP! Follow “B” inthe above safety information.
knob counter-clockwise to “PILOT”.
Push the gascontrol in
fully and hold, Keep knob
depressed for about 30 seconds after
pilot islit. Release knob. If pilot goes out,
repeatsteps 4 through 5.
: this gas valve hasa lockout device, whichwill
not allow
stop and immediately
If the pilot does not staylit after several tries, turn the gas
control
Turn the gascontrolknob counter clockwise to the
“ON”
Turn on the electrical power tothe unit.
WARNING
6.
7.
the pilot burner to be relit untilthethermocouple
has cooled. If the knob does not pop up when released,
call your service technician or gas
supplier.
knob to “OFF” and call your service technician or
gas supplier.
position.Flip the burner switch to
“ON” THEN TURNTHE “HI/LOW” knob tothe desiredsetting.
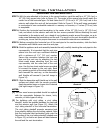
Figure 3. Lighting instruction label.
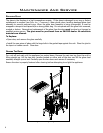
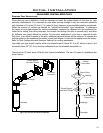
PILOT LIGHT:
1. Turn off the gas to the replace. If not recently done, remove the glass and let the unit air out
for at least ve (5) minutes to clear out any gas. Turn on gas to the heater. Leak test all joints
with soapy water. NEVER USE AN OPEN FLAME FOR LEAK TESTING.
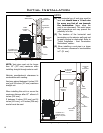
Figure 4. Pilot ame.
2. Start the pilot by pressing the gas control knob and turning it to PILOT. While
holding the gas control knob in, press the piezo ignitor several times until the
pilot light starts. Hold the gas control knob in for thirty (30) seconds. Check
that the pilot has fully engulfed the thermocouple assembly (see Figure 4).
3. Start the main burner by turning the gas control knob to ON and then turn
the rocker switch to ON. Check that all burner ports have ame.
4. Leak test all gas joints again.