


SECTION IV: ACCESSORY ITEMS
AC-101/SH-101 Brass Trim
There are three (3) pieces of J-channel trim in this kit that snap onto the two top
edges of the unit and the ash apron edge. Remove the protective cover from the trim
and match it to the corresponding edge of the stove -- the trim simply slips over the
corresponding edge of the unit. If required, high temperature silicone can be used on the
inside of the trim.
AC-01 Brass Knobs (Per Set)
The brass knobs have a wide base and sit on the top of the stove.
AC-02 Brass Rail
This accessory is pre-mounted on a metal base and sits on the top of the stove.
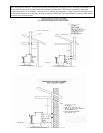
AC-IHS/SH-HS25 Side and Rear Heat Shield
This accessory is a two piece heat shield that is installed to the rear of the stove and
will give six inches (6”) clearance to a combustible. The shield is attached one piece at a
time, with the bolts mounting to the four weld nuts on the rear of the stove. This heat
shield will allow six inches (6”) clearance from the rear of the unit; however, the thirty
inches (30”) clearance to a combustible will still be required on the sides. The flue pipe
must be shielded or double wall if it is less than eighteen inches (18”) from a
combustible.
NOTE: You must use the top vent option of your unit with the use of this heat shield.
SECTION V: OPERATING INSTRUCTIONS
A. Building a Fire
Your new stove is equipped with a catalytic combustor, which requires the following
start-up procedure. Inspect your unit to ensure the combustor is well seated in the
combustor housing.
CAUTION: ALWAYS PULL OUT THE BY-PASS DAMPER COMPLETELY BEFORE
OPENING THE FRONT DOOR. NEVER LIGHT YOUR FIRE WITH GASOLINE,
KEROSENE, DIESEL FUEL OR CHARCOAL LIGHTER FLUID; THIS COULD BE
VERY DANGEROUS.
NOTICE: Your new stove and the connector pipe may smoke for a short period of time.
This is called “cooking out” and is no cause for alarm. During the first few hours
of operation, it is a good idea to open some doors and windows.
1.
Be sure there are no combustible materials in the immediate area of the stove.
2. Pull out the slide damper located under the ash lip and the by-pass damper located
on the top right side of the unit.