


Page 11
MAINTENANCE
Cleaning Pilot Burner
After use, cleaning of the pilot burner may be required for the
proper flame. The pilot orifice can be cleaned with high pressure
air or by placing under running water. Pilot orifice must be dry
before replacement. Use a pipe cleaner to clean inside the pilot
after the pilot orifice has been removed.
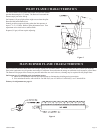
Removing Pilot Orifice
1. Disconnect the pilot supply line at the pilot burner
2. Remove pilot orifice from pilot burner. It may be necessary to
tap on pilot burner in order to remove the pilot orifice.
Cleaning Main Burner
Remove the burner and apply water pressure inside the throat of the
burner and down into the ports; follow with air pressure.
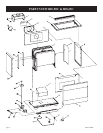
Removing Main Burner
1. Remove casing front.
2. Disconnect pilot bracket from the burner.
3. Remove brass nut from burner.
4. Disconnect burner from chamber leg flange.
5. Remove burner from bottom of combustion chamber.
Cleaning Combustion Chamber
A qualified serviceman should remove the chamber and apply air
pressure to the inside in order to clear all passageways.
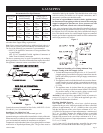
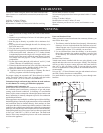
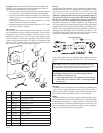
Primary Air Adjustment
1. A primary air adjustment bolt is located on left, front of burner throat.
The bolt can be screwed into burner throat to REDUCE primary
air or unscrewed from burner throat to INCREASE primary air.
To reduce yellow flame on main burner,
unscrew bolt from burner throat. Also, refer to Step 2.
To reduce resonation (whistling) noise or extinction (popping)
noise, screw bolt into burner throat.
2. An air shutter bracket is attached to top of burner throat.
The air shutter bracket lays flat across top of burner throat.
If yellow flames can not be removed from main burner by
using primary air adjustment bolt, the air shutter bracket can
be pivoted upward to allow additional primary air to enter
burner throat.
On Propane gas, if a whistling noise (resonation) occurs, screw
the air adjustment bolt into the burner throat to eliminate the
whistling noise (resonation).
TROUBLESHOOTING
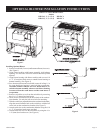
1. Impossible to light pilot
a. If using piezo ignitor, check electrode location.
b. Remove nut at orifice and check for gas.
c. If gas available, check for blocked orifice or pilot.
2. Pilot outage
a. Proper size of pilot flame.
b. Defective or weak thermocouple.
3. Pilot flames but goes out
a. Pilot flame not covering the thermocouple properly when
knob is released.
b. Defective thermocouple.
c. Defective magnet in the safety section of valve.
4. Poor thermostatic control
a. Thermostat needs calibrating.
b. Defective thermostat section.
5. Noisy blower
a. Tighten blower screws.
b. Check blower wheel in the open for balance.
6. Yellow main burner flame
a. Remove main burner to check for obstructions in throat,
ports and orifices.
b. Install new main burner orifice and pilot orifice
c. Check gas valve for leaking.
d. Open the air bolt on the main burner in order to increase the
amount of primary air.
7. Yellow pilot flame
a. Small yellow tip not objectionable.
b. Remove pilot orifice. Check and clean.
8. Pilot and main burner go out after burning a few minutes
a. Improper venting of flue products. Relight and check for
improper venting.
b. If vented properly, check vent safety switch, replace if
defective.
9. Burner back-flashes or ‘pops’ and burns and main burner
orifice.
a. Examine burner for defects.
10. Inoperative blower
a. Check fan control by shorting across terminals.
b. Check for blower wheel bind by removing wheel and operat
-
ing motor.
c. Check for frozen bearings due to lack of oil.
12822-4-0806