12
NEVER LEAVE THE HEATER
UNATTENDED WHILE BURNING!
F.) SPARK PLUG
CLEAN AND REGAP EVERY 600 HOURS
OF OPERATION OR REPLACE AS
NEEDED.
-Remove upper shell(See 10 page).
-Remove Fan Blade(See 11 Page).
-Remove Ignitor Wire from Spark Plug.
-Remove Spark Plug from Burner Head using
medium phillips screwdriver.
-Clean and regap Spark plug electrodes to
0.140 (3.5mm) gap.
-Reinstall Spark Plug in Burner Head.
-Attach Ignitor wire to Spark Plug.
-Reinstall Fan and Upper Shell.
G.) PHOTOCELL
CLEAN PHOTOCELL ANNUALLY OR AS
NEEDED.
-Remove upper shell(See page 10).
-Remove fan (See page 11).
-Remove photocell from photocell bracket.
-Clean photocell lens with cotton swab.
TO REPLACE:
-Disconnect switch wires from power switch.
-Remove two Screws using medium phillips
screwdriver.
These Screws attach Main PCB to Side
Cover.(See Figure 17)
-Remove Side cover(R).
-Disconnect Photocell Connector from Circuit
Board and remove photocell.
-Install new Photocell and connect photocell
connector to Circuit Board.
-Replace Circuit Board to Side Cover(R) and
Switch wires to Power Switch.
-Replace Fan and Upper Shell.
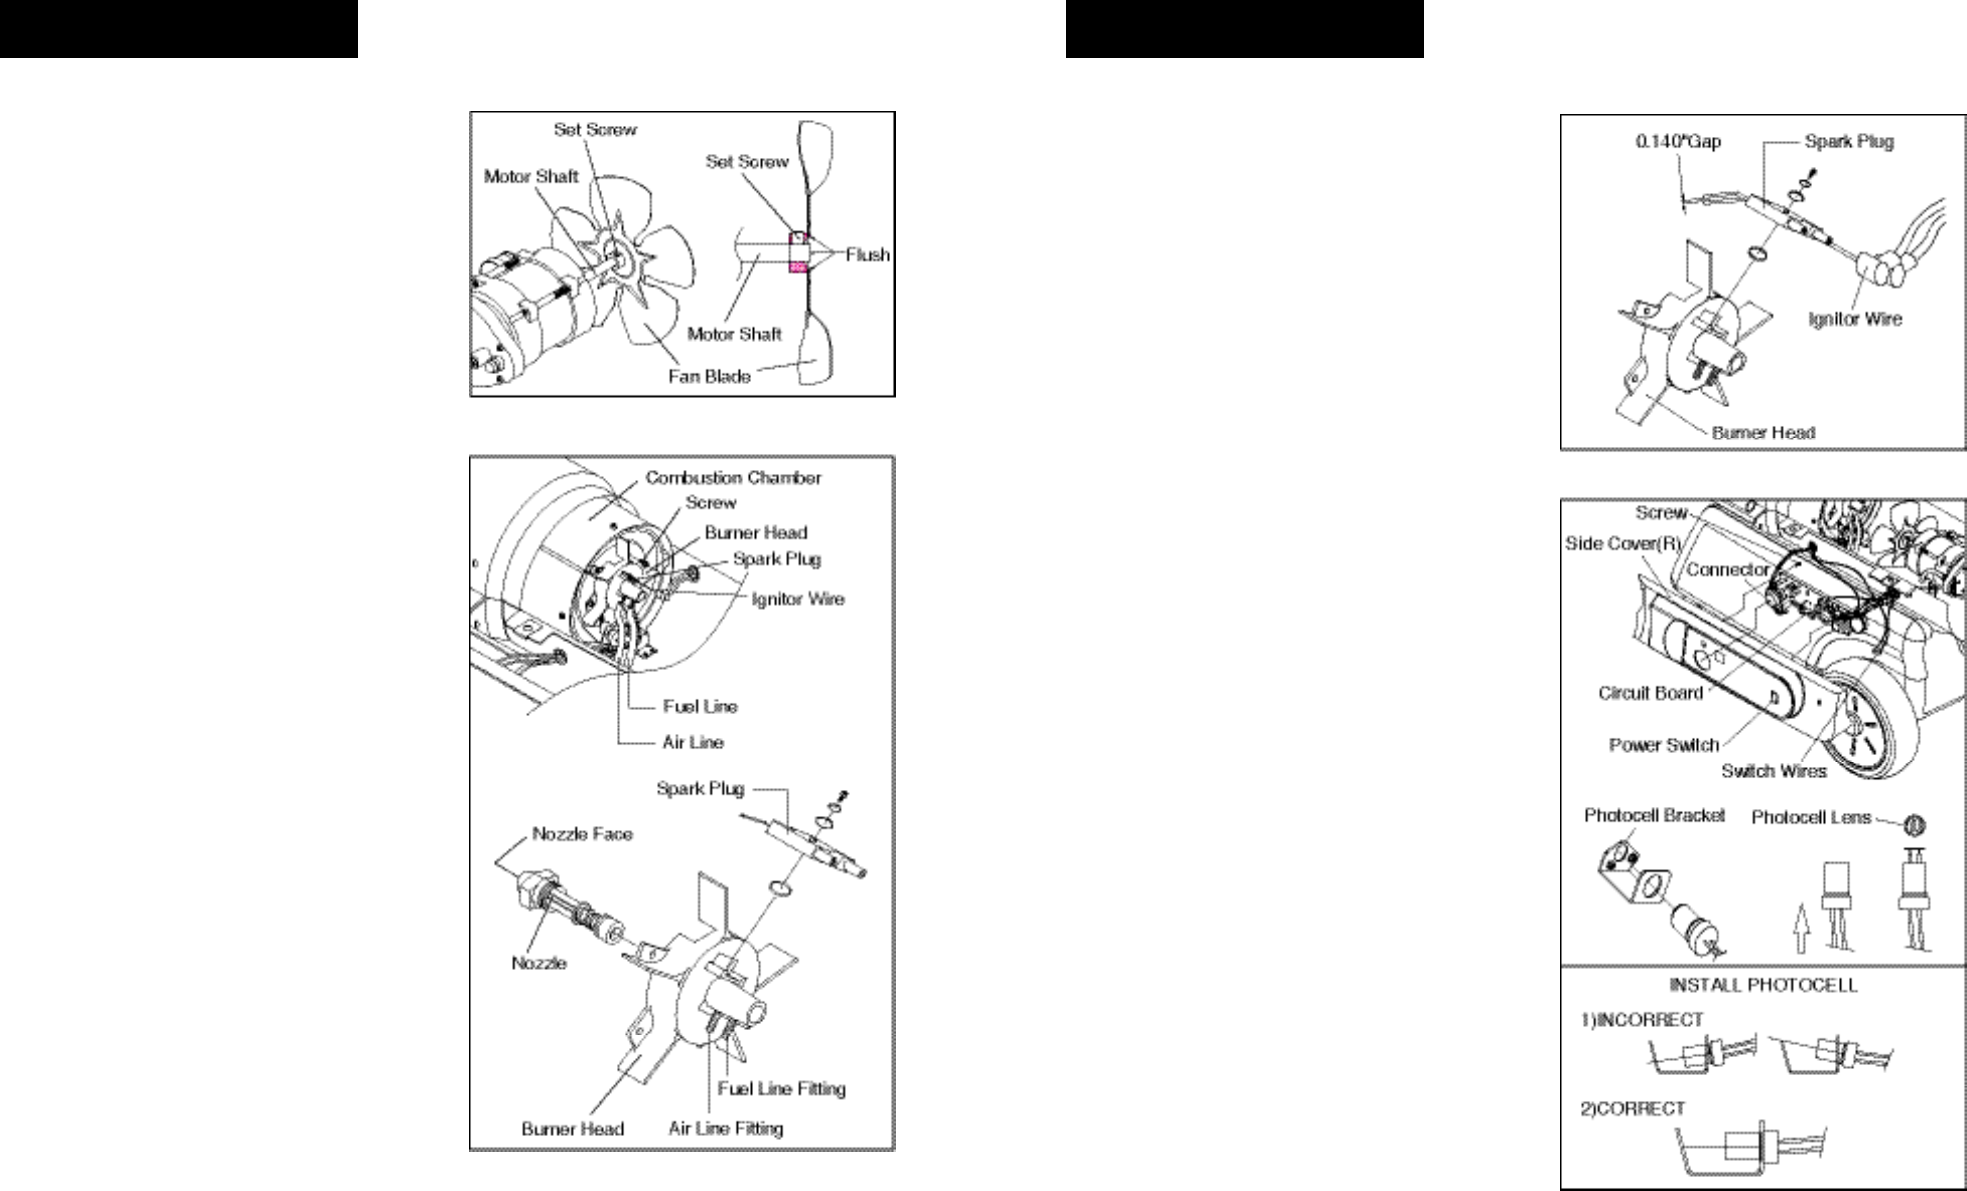
Figure 16. Removing Spark Plug
Figure 17. Replace & Cleaning Photocell
11
NEVER LEAVE THE HEATER
UNATTENDED WHILE BURNING!
D.) FAN BLADES
CLEAN EVERY SEASON OR AS NEEDED.
-Remove upper shell(See 10 page.)
-Use 1/8" allen wrench to loosen set screw
which holds Fan Blade to motor shaft.
- Slip Fan Blade off motor shaft.
-Clean Fan Blade using a soft colth moistened
with kerosene or solvent.
-Dry Fan Blade throughly.
-Reinstall Fan Blade on motor shaft. Place Fan
Blade hub flush with end of motor shaft.
-Place Set Screw on flat of shaft. Tighten Set Screw
firmly(40~50 inch-pounds/4.5~5.6 N-m).
E.) NOZZLE
REMOVE DIRT IN NOZZLE AS
NEEDED(See Page 14)
-Remove Upper Shell(See page 10).
-Remove Fan Blade(See Fan Blades).
-Remove Fuel and Air Line from Burner Head.
-Remove Ignitor Wire from Spark Plug.
-Remove three Screws using medium phillips
screwdriver and remove Burner Head from
combustion chamber.
-Remove Spark Plug from Burner Head using
medium phillips screwdriver.
-Carefully remove Nozzle from Burner Head
using 5/8" socket wrench.
-Blow compressed air through face of
Nozzle.(this will remove any dirt in Nozzle)
-Reinstall Nozzle into Burner Head and tighten
firmly. (80~110 inch-pounds)
-Reinstall Spark Plug in Burner Head.
-Attach Ignitor wire to Spark Plug.
-Attach Fuel and Air Line to Burner Head.
-Reinstall Fan Blade and Upper Shell.
Figure 14. Fan and Setscrew Location.
Figure 15. Removing Nozzle


