


6
NEVER LEAVE THE HEATER
UNATTENDED WHILE BURNING!
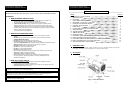
4. KEROSENE (1-K)
For optimal performance of this heater, it is strongly suggested that 1-K kerosene be used. 1-K kerosene has
been refined to virtually eliminate contaminants, such as sulpher. Which can cause a rotten egg odor during
the operation of the heater. However, #1 or #2 fuel oil (diesel fuel) may also be used if 1-K kerosene is not
available. Be advised that these fuels do not burn as clean as 1-K kerosene, and care should be taken to
provide more fresh air ventilation to accomodate any added contaminants that may be added to the heated
space.
KEROSENE SHOULD ONLY BE STORED IN A BLUE CONTAINER THAT IS CLEARLY
MARKED “KEROSENE”. NEVER STORE KEROSENE IN A RED CONTAINER.
Red containers are associated with gasoline.
NEVER store kerosene in the living space. Kerosene should be stored in a well ventilated place outside the
living area.
NEVER use any fuel other than 1-K kerosene (#1 fuel oil is an acceptable substitute.)
NEVER use fuel such as gasoline, benzene, alcohol, white gas, camp stove fuel, paint thinners, or other oil
compounds in this heater. These are volatile fuels that can cause an explosion or uncontrolled flames.
NEVER store kerosene in direct sunlight or near a source of heat.
NEVER use kerosene that has been stored from one season to the next. Kerosene deteriorates over time.
“OLD KEROSENE” WILL NOT BURN PROPERLY IN THIS HEATER.
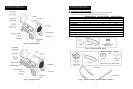
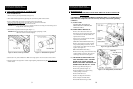
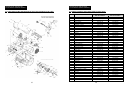
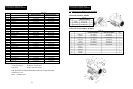
Figure 8. Wheel and Handle Assembly, RMC-KFA120TDLX/RMC-KFA170TDLX Models Only.
NOTE : Heater should be inspected before each use, and at least annually by a qualitied service person.
2. ASSEMBLY
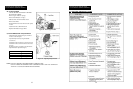
A. For RMC-KFA65TDLX Model only (See Figure 6,7)
Tools Required
• Medium Phillips Screwdriver
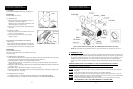
1. Assembling Handle.
1) Align boss on bottom of handle with the 2 holes on
the shell cover as shown in Figure 6
NOTE : Be sure to match the tab in the bottom of the
handle with the slot in housing cover.
2) Insert screws into the holes in the handle and tighten
each screw.
2. Assembling Cord Wrap
1) Align 2 boss on the cordwrap with the 2 holes on the
side cover as shown in Figure 7
2) Insert screws into the holes in the cord wrap and
tighten each screw.
B. For RMC-KFA120TDLX/RMC-KFA170TDLX
Models Only.
These models are furnished with wheels, front handle,
handle and cordwrap, Wheels, Handles, Cordwraps and
the mounting hardware are found in the shipping carton.
Tools Required
• Medium Phillips Screwdriver
• 38" Open or Adjustable Wrench, Use US(Inch) Screws Nuts.
• Long Nose Pliers
1. Assembling Wheel & Front Handle
1) Slide one Wheel & Bushing over the Wheel Axle,making sure that the extended hub of the wheel points
towards the wheel points towards the Wheel Support(See Figure 8,Page 6).
2) Slide Flat Washer over Wheel Axle end,past the hole in the axle.
Slide Cotter Pin into the hole in the Wheel axle, and using your pliers bend the legs of the Cotter Pin
until it can not be removed.
3) Slide Wheel Axle through Wheel Support and assemble the Bushing Wheel, Flat Washer and Cotter Pin
as in Steps 1 and 2.
4) Place Wheel Caps on Flat Washers until they snap in place securely.
5) Place Front Handle on shell flange and insert screws through front handle, shell flange and tighten each
screw after each screw is inserted.
2. Assembling Handle & Cord Wrap.
1) Assembling Handle : Assemble by method described above for model RMC-KFA65TDLX.
2) Assembling Cord Wrap : Assemble by method described above for model RMC-KFA65TDLX.
5
NEVER LEAVE THE HEATER
UNATTENDED WHILE BURNING!
Figure 6. Handle Assembly
Figure 7. Cord Wrap Assembly