Installation Dometic CA1000
28
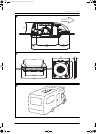
7.2.2 Installation in an existing sunroof opening
I
Note
Existing roof hatch openings of 400 to 435 mm are suitable for the instal-
lation of the roof air conditioner.
I
Note
The manufacturer only assumes liability for parts included in the scope of
delivery. The validity of the warranty expires if the device is installed to-
gether with third-party parts.
a
Caution – risk of damage
Please observe the structural engineering of the vehicle and seal of all
openings made when installing the roof air conditioner.
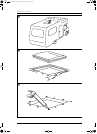
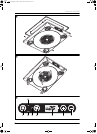
Removing the roof hatch
➤ Remove all screws and fixtures of the existing roof hatch.
➤ Take out the roof hatch.
➤ Remove the sealant around the opening using a scraper or similar tool
(fig. 5, page 3).
➤ Use a sealant to seal the bore holes (fig. 6, page 3).
I
Note
Dispose of all waste material, glue, silicone and seals separately. Ob-
serve the disposal guidelines.
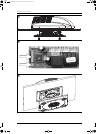
7.2.3 Laying the power cable (fig. 7, page 4)
e
Caution – danger of electrocution
Make sure there is no voltage at electrically operated components before
carrying out work on them!
➤ The roof air conditioner must be connected to an electric circuit which
is able to supply the required current.
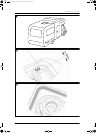
7.2.4 Pre-assembly of the roof air conditioner
➤ Screw the M8x160 threaded bolts supplied into the openings provided
on the underside of the system (approx. 18 mm deep).
I
Note
The threaded bolts supplied can be used for roof thicknesses of
35-50 mm. For roof thicknesses of less than 35 mm, the threaded bolts
must be shortened accordingly.
Example of shortening the bolts:
35 mm (minimum roof thickness) – 25 mm (measured thickness)
= The threaded bolts must be shortened by 10 mm.
_IA_CA1000.book Seite 28 Freitag, 30. Januar 2009 11:12 11