


7
All/Perimeter System Arming
Area Assignment: Your security system is divided into two separate
areas. Motion detectors, inside doors, and other interior protection
devices are assigned to the
Interior
area while windows and exterior
doors are assigned to the
Perimeter
area.
Perimeter or All: When arming an All/Perimeter system, the keypad
displays PERIM ALL. If you select ALL, you arm both the
Perimeter and the Interior of the system. You’ll want to arm both of
these areas when leaving with nobody left inside. Selecting PERIM
arms only the Perimeter of the system. Perimeter arming is for when
you’re staying inside but want the comfort of knowing the exterior
doors and windows are armed. Perimeter arming allows you to move
freely about inside without setting off any interior alarms.
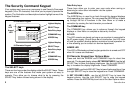
System Ready/System Not Ready Keypad Displays
When all zones in the system are in a normal condition, the keypad
displays SYSTEM READY. If there are one or more zones that are not
in a normal condition, the keypad displays SYSTEM NOT READY.
Pressing any top row SELECT key during this display shows the zone
name allowing you to investigate the problem.
Bypass and Force arming
When one or more zones are in a
non-normal
condition, the keypad
displays OKAY BYPASS STOP. Select OKAY to force arm the bad
zones. Force armed zones that restore to normal while the system is
armed are included back into the system. Select BYPASS to bypass
the bad zones. Bypassed zones that restore to normal while the
system is armed are NOT included back into the system. Use the
bypass feature to remove a zone from the system that is temporarily
out of service. This is a useful feature during remodeling when doors
or windows are being removed.
Arming and Disarming
Arming an All/Perimeter System
1. Enter your user code. The keypad displays PERIM ALL.
2. Select PERIM to arm the Perimeter area only.
3. Select ALL to arm both the Perimeter and Interior areas.
4. The keypad displays any zones that have been bypassed prior
to arming and 24 hour zones that are in a bad condition.
5. Bypass or force arm any bad zones if required. See below:
5a. If a problem exists on a zone, the zone name and problem is
displayed followed by OKAY BYPASS STOP.
5b. Select OKAY to force arm the bad zone.
5c. Select YES to bypass the bad zone.
5d. Select STOP to stop the arming. Correct the problem on the
zone and return to step 1.
6. The Security Command displays PERIMETER ON if only the
perimeter is being armed and ALL SYSTEM ON if both the
perimeter and interior are being armed.
7. The Security Command next displays EXIT: ## INSTNT and
begins to count down the number of seconds remaining for you
to exit. When the delay expires, all zones are armed.
8. You can select INSTNT while EXIT: ## INSTNT is displayed to
immediately arm all exit zones and make them instant zones
without exit or entry delays. The keypad displays INSTANT.
9. When the system is fully armed, the keypad displays PERIMETER
ON for perimeter arming and ALL SYSTEM ON for perimeter
and interior arming.