


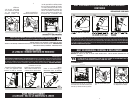


Enroulez le tuyau à l’arrière du
support de tuyau (Schéma 4).
Insérez la rallonge de tuyau sur le côté droit
de l’aspirateur (Schéma 4a).
ARRIÈRE
6
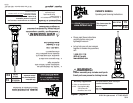
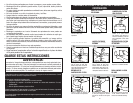
HOW TO ASSEMBLE
ASSEMBLAGE
6
TOOL REQUIRED: PHILLIPS OR FLAT HEAD SCREWDRIVER
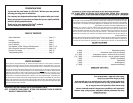
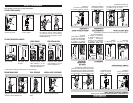
ATTACH FIXED HANDLE*
Retirez le le godet à
poussière du corps de
l’aspirateur.
Glissez la poignée
dans le trou situé en
haut de l’aspirateur.
Insérez le boulon dans le trou (situé sous le
support à accessoires) à l’arrière de l’aspirateur
(illustration 3). Placez l’écrou à l’extrémité du
boulon sortant du panneau arrière puis serrez
pour fixer la poignée. (illustration 3a).
OUTIL NÉCESSAIRE : TOURNEVIS À POINTE CRUCIFORME OU À TÊTE PLATE
COMMENT FIXER LA POIGNÉE FIXEE*
Fixez le suceur plat et la
brosse à épousseter sur
le support à accessoires.
Remettez le godet à poussière en
l’inclinant vers l’arrière pour
l’enclencher.
POUR FIXER LE TUYAU
RANGEMENT DES
ACCESSOIRES
INSTALLATION DU GODET
ÀPOUSSIÈRE
1.
Remove dirt container
from body of cleaner.
Slide handle into hole
on top of cleaner.
1.
Insert screw through hole (located under
tool caddy) on back of cleaner (Diagram
3). Place bolt onto end of screw coming
through back panel and tighten to secure
handle (Diagram 3a).
FRONT
2.
3.
3a.
2.
3.
3a.
AVANT
5.
6.
4.
4a.
Attach crevice tool
and dust brush to tool
caddy.
Replace dirt container by tilting
back until it snaps into place.
5.
6.
Wrap hose around back of hose caddy
(Diagram 4). Push hose wand down into the
right side of cleaner (Diagram 4a).
4.
4a.
BACK
SECUREBACKHOSE TOOL STORAGE INSTALL DIRT CONTAINER
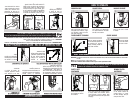
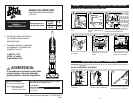
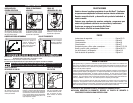
HANDLE
DOWN
BUTTON BUTTON
Insert handle into
body of cleaner.
Push down firmly
until handle locks
into place.
For storage, press the
telescopic handle release
button (Diagram 1) on the
back of the cleaner and push
handle down (Diagram 1a).
For regular use, push the
telescopic handle release
button (Diagram 1) and pull
handle up (Diagram 1a).
1.
2.
FOR STORAGE FOR REGULAR USE
1.
1a.
1.
1a.
ATTACH TELESCOPIC HANDLE*
* Fixed handle or telescopic handle depends on selected model.
POIGNÉE TÉLESCOPIQUE*
HANDLE
DOWN
BUTTON BUTTON
Insert handle into
body of cleaner.
Push down firmly
until handle locks
into place.
For storage, press the
telescopic handle release
button (Diagram 1) on the
back of the cleaner and push
handle down (Diagram 1a).
For regular use, push the
telescopic handle release
button (Diagram 1) and pull
handle up (Diagram 1a).
1.
2.
FOR STORAGE FOR REGULAR USE
1.
1a.
1.
1a.
* Poignée fixe ou poignée télescopique en fonction du modèle choisi.
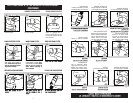
Insérez la poignée
dans le corps de
l’aspirateur.
Appuyez fermement
pour enclencher la
poignée.
Pour ranger l’aspirateur,
appuyez sur le bouton de
dégagement de la poignée
télescopique (illustra-
tion 1) située à l’arrière de
l’aspirateur et abaissez la
poignée (illustration 1a).
Pour utiliser l’aspirateur,
poussez le bouton de
dégagement de la poignée
télescopique (illustration 1)
et relevez la poignée (illus-
tration 1a).
RANGEMENT
POUR UNE
UTILISATION
RÉGULIÈRE
BOUTON BOUTON
POIGNÉE
ABAISSÉE