


small text
SUB-HEADING
callouts
8
BELT OR BRUSH REMOVAL & REPLACEMENT
TOOL REQUIRED: PHILLIPS SCREWDRIVER
WARNING:
TO REDUCE THE RISK OF INJURY FROM MOVING PARTS - UNPLUG CLEANER BEFORE CHANGING BEL T OR BRUSHROLL.
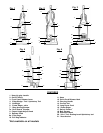
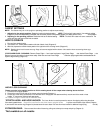
TO REMOVE BELT Flip cleaner to expose nozzle base as shown in (Diagram 1). To remove nozzle cover, use Phillips screwdriver
to remove the four screws. Arrows in diagram 1 show location of screws. Flip cleaner back over and lift nozzle cover off. Slid e belt off motor
shaft (Diagram 2). Lift and remove brushroll (Diagram 3). Dispose of old belt.
TO REPLACE BELT
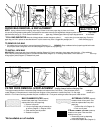
1. Place belt on motor shaft, then slip brushroll through belt. Place belt in area of brushroll without bristles (Diagram 4).
2. With belt in place, pull and slide brushroll into nozzle (Diagram 3) making sure that the brushroll end caps are in the cor rect orientation
(Diagram 3a inset).
IMPORTANT: Rotate brushroll manually in both directions to make sure belt is not twisted and is properly aligned.
3. Reattach nozzle cover. Secure by replacing the screws under the nozzle base.
BELT STORAGE
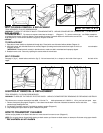
See page 4. (fig. 4) - stretch belt around hooks. (fig. 5) - fold and secure belt (in a u shape) on the inside of the loops on the back of the
upright.
BELT STYLE:
4 & 5
4.
2.
3.
1.
3a.
LIGHTBULB* REMOVAL & REPLACEMENT
TOOL REQUIRED: FLATHEAD SCREWDRIVER
WARNING: TO REDUCE THE RISK OF ELECTRIC SHOCK - UNPLUG CLEANER BEFORE REMOVING OR REPLACING LIGHTBULB.
This cleaner uses a common automotive lamp #906, 13.0 volts. For bulb replacement call 1-800-321-1 134 or your local auto parts store.
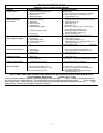
1. Remove front panel (See page 9, Diagram 1). Lean cleaner handle back. Insert end of standard screwdriver into the side slot a nd pry
outward to pop headlight lens out.
2. Pull bulb out of socket to remove. Push bulb into socket to replace (Diagram 2).
3. Snap headlight lens panel back into place. Reattach front panel.
HOW TO TRANSPORT CLEANER
Use the carrying handle on the back of the cleaner to move cleaner from room to room (Diagram 3).
NOTE: Do not push cleaner forward while leaning on back casters, pull cleaner on back casters, or attempt to lift cleaner using upper handle.
* Not available on all models
1.
2.
3.