


www.desatech.com
119939-01A
2
ASSEMBLING MANTEL
IMPORTANT: More than one person is required to lift
assembled mantel. Lift mantel by leg assemblies. Lifting
by header or mantel top could damage mantel.
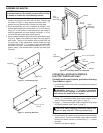
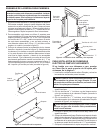
1. Some models require side/corner assembly. For these
models,laylegfrontonsoftclothonoor.Positionleg
as shown in Figure 1. Align bottom and attach with 1
1
/
4
"
screws through pocket holes. Repeat for other side.
2. Each leg assembly will use 3 brackets for stability. Your
bracket hardware kit will contain either 1/2" or 3/4" screws.
Using 1/2" or 3/4" screws, install a bracket in the center of
each leg assembly and one at each end within 1" of but
not over the last pocket hole (see Figure 2).
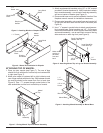
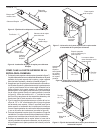
3. Place header between right and left leg assemblies (see
Figure 3). Make sure header and legs are snug against
eachother.Thetopoftheheadermustbeushwiththe
top and sides of leg assemblies. Attach header through
predrilled holes with 1
1
⁄4" screws on each leg assembly
asshowninFigure3.Attachatbracketswith1/2"or3/4"
screwsusing1atbracketand4screwsperside(see
Figure 4).
Left
Side Leg
Assembly
Right
Side Leg
Assembly
Header
Figure 3 - Installing Header
Top of
Mantel
Figure 1 - Assembling Legs
Leg Front
Leg Side
1
1
/
4
" Screws
FOR INSTALLATION WITH DIMPLEX
ELECTRIC FIREPLACE ONLY
If installing with a gas replace, proceed to Attaching
Top of Mantel, page 3.
1. LocateDimplexllercomponentsandgathertoolsrequired
for assembly.
WARNING: Only use 1
1
/
4
" screws to assemble
Dimplex kit pieces. Damage to the mantel will result if
other screws are used for this purpose.
2. Place large header portion face down on a soft surface.
3. Using 1
1
/
4
" screws provided, attach short blocks to both
ends of Dimplex header (see Figure 5, page 3).
4. Using 1
1
/
4
" screws provided, attach long block to top edge
of Dimplex header (see Figure 5, page 3).
CAUTION: When attaching blocks be careful that
they do not spin with drill. This may cause injury.
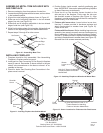
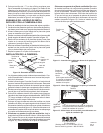
5. Place mantel face down on soft surface.
6. Place Dimplex kit header into space below mantel header
(see Figure 6). Push the kit header tightly against mantel
header and attach blocks to mantel using 1
1
/
4
" screws
provided.
7. Carefully set mantel upright.
Bracket
1/2" or 3/4"
Screw
Figure 2 - Installing Brackets
Flat
Bracket
1/2" or 3/4" Screws
Header
Leg
Assembly
1
1
/
4
" Screws
Figure 4 - Installing Header and Brackets