


11
104636
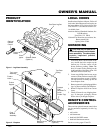
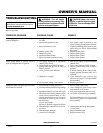
OWNER’S MANUAL
INSTALLATIONS
Continued
Installation Items Needed
• 5/16" hex socket wrench or nut-driver
• Phillips screwdriver
• sealant (resistant to propane/LP gas, not
provided)
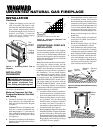
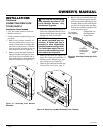
1. Remove front window assembly. Lo-
cate two phillips-head screws at top
corners of front window assembly. Re-
move and save these screws. Carefully
lift front window assembly up and out
from fireplace front (see Figure 18).
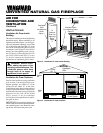
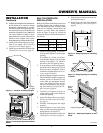
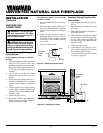
2. Remove screws that attach log base as-
sembly to fireplace (see Figure 19). Care-
fully lift up log base assembly and re-
move from fireplace without disturbing
the brick liner panels (see Figure 19).
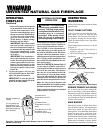
CONNECTING FIREPLACE
TO GAS SUPPLY
CAUTION: Do not pick up log
base assembly by burners. This
could damage burners. Only
handle base by grates.
Continued
3. Route flexible gas line provided by in-
staller from equipment shutoff valve to
fireplace. Route flexible gas supply line
through one of the access holes.
Figure 19 - Removing Log Base Assembly From Fireplace
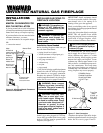
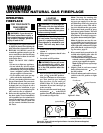
Figure 20 - Attaching Flexible Gas Lines
Together
4. Attach gas line from gas supply (see
Figure 20). Check gas connection of
flexible gas line attached to gas regu-
lator of fireplace (see Figure 20).
5. Check all gas connections for leaks. See
Checking Gas Connections, page 12.
NOTICE: Most building codes do
not permit concealed gas con-
nections. A flexible gas line is
provided to allow accessibility
from the fireplace (see Figure 20).
The flexible gas supply line con-
nection to the equipment shutoff
valve should be accessible.
Figure 18 - Removing Front Window
Assembly
To Fireplace
Gas Regulator
Flexible Gas Line
from Equipment
Shutoff Valve
Equipment
Shutoff Valve
Provided by
Installer
➞
➞
To Gas
Meter
6. Replace log base assembly back into
fireplace. Feed flexible gas line into fire-
place base area while replacing log base
assembly. Make sure the entire flexible
gas line is in fireplace base area. Reat-
tach log base assembly to fireplace with
screws removed in step 2.