


112126-01B
For more information, visit www.desatech.com
For more information, visit www.desatech.com
27
27
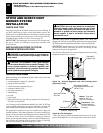
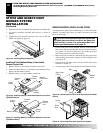
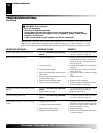
HI
LO
IN
OUT
OPTIONAL HAND-HELD
REMOTE OPERATION
OPERATING STOVE WITH
BURNER SYSTEM
Continued
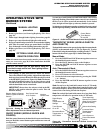
Selector Switch in Remote
Position (Optional Remote
Control)
Variable
Control Knob
Gas Control Knob
in On Position
MANUAL LIGHTING
procedure
1. Remove glass door (see Removing/Replacing Glass Door,
page 24).
2. Follow steps 1 through 8 under Lighting Instructions, page 26.
3. Depress gas control knob and light pilot with match.
4. Keep gas control knob pressed in for 30 seconds after lighting
pilot. After 30 seconds, release gas control knob. Now follow
steps 10 through 14 under Lighting Instructions, page 26.
5. Replace glass door (see Removing/Replacing Glass Door,
page 24).
OPERATING STOVE AND BURNER SYSTEM
Manual Lighting Procedure
Optional Hand-Held Remote Operation
Note:
All remote control accessories must be purchased sepa-
rately (see Accessories, page 38). Follow instructions included
with the remote control.
NOTICE: You must light the pilot before using the
hand-held remote control unit. See
Lighting Instruc-
tions
on page 26.
1. After lighting, let pilot flame burn for about one minute.
Turn control knob to ON position. Adjust flame adjustment
knob anywhere between HI and LO. Slide the selector switch
to the REMOTE position (see Figure 60).
Note:
The burner
may light if hand-held remote was on when selector switch
was last turned off. You can now turn the burner on and off
with the hand-held remote control unit.
IMPORTANT:
Do not leave the selector switch in the RE-
MOTE or ON position when the pilot is not lit. This will
drain the battery.
To Lock press both buttons on hand-held remote control until
light stops flashing. Hand-held remote control is now locked. If
the fire is on it will be turned off automatically. In the locked
state, the light will not light up when any button is pressed.
To Unlock press both buttons together on hand-held remote control
until the light stops flashing. The hand-held remote is now unlocked.
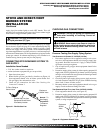
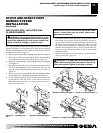
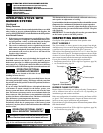
ON/OFF SERIES (MODELS GHRCB AND
CGHRCB)
Hold the control button on the hand-held remote until burner
turns on. Hold the control button again until burner turns off
(see Figure 61).
Figure 60 - Setting the Selector Switch, Control Knob, and
Flame Adjustment Knob for Remote Operation
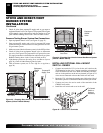
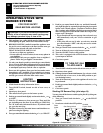
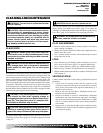
THERMOSTAT SERIES (MODELS GHRCTB
AND CGHRCTB)
The hand-held remote can be operated using either the manual mode
(MANU) or thermostatic mode (AUTO) (see Figure 62). To select
Fahrenheit/Centigrade mode display, carefully press the ˚C/˚F mode
button with the end of a paper clip or similar blunt object.
Manual Mode
1. Press the POWER and LOCK buttons together to turn on
the hand-held remote control.
2. Press the MANU button to turn on the fireplace.
3. Press the POWER and LOCK buttons together to turn
off the fireplace.
Auto (Thermostatic) Mode
1. Press the POWER and LOCK buttons together to turn on
the hand-held remote control.
2. Press AUTO button to select this mode.
3. Set the desired room temperature by pressing the TEMP
+ or - buttons.
4. Press the POWER and LOCK buttons together to turn
off the fireplace
Note:
Do not leave the hand-held remote in the AUTO mode
close to the fireplace. The radiant heat from the fireplace will
turn off the fireplace. Ideally, place the hand-held remote in the
center of the room facing towards the fireplace.
Note:
Do not hold the hand-held remote for a long time. Body
temperature will affect its operation in the AUTO mode.
Figure 61 - On/Off Hand-Held Remote Control Unit (C)GHRCB
Control Button
Turns Burners
On and Off
Figure 62 - Thermostat Hand-Held Remote Control Unit
(C)GHRCTB
Turns Hand-Held
Remote On or Off and
Allows You to Choose
the Manual Setting
Selects Auto Setting
Increases Room
Temperature in
AUTO Mode
Locks System to
Prevent Accidental
Ignition
Digital Display
Shows
Temperature and
Settings
Turns Burners
On or Off
Decreases Room
Temperature in
AUTO Mode