


111515-01C
For more information, visit www.desatech.com
For more information, visit www.desatech.com
16
HAND-HELD
REMOTE OPERATION
NOTICE: You must light the pilot before using the
hand-held remote control unit. See
Lighting Instruc-
tions
, page 15.
Shutting Off Heater
Press on/off key on remote control and turn control knob
clockwise to the OFF position (see Figure 25, page 15).
Shutting Off Burners Only (pilot stays lit)
Press the on/off key on remote control or turn control knob
clockwise to the PILOT position.
TO TURN OFF GAS
TO APPLIANCE
MANUAL LIGHTING
PROCEDURE
1. Follow steps 1 through 7 under Lighting Instructions,
page 15.
2. Depress control knob and light pilot with match.
3. Keep control knob pressed in for 30 seconds after lighting
pilot. After 30 seconds, release control knob. Now follow steps
9 through 11 under Lighting Instructions in column 1.
CAUTION: Do not try to adjust heating levels by
using the equipment shutoff valve.
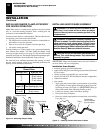
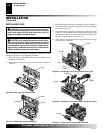
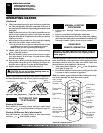
Figure 27 - Pilot (Propane/LP)
Ignitor
Electrode
Pilot Burner
Figure 28 - Pilot (Natural)
Ignitor
Electrode
Pilot Burner
Note:
The pilot flame on natural gas units will have a slight curve,
but flame should be blue and have no yellow or orange color.
OPERATING HEATER
Continued
OPERATING HEATER
Lighting Instructions (Cont.)
To Turn Off Gas To Appliance
Manual Lighting Procedure
Hand-Held Remote Operation
8. With control knob pressed in, press and release ignitor but-
ton. This will light pilot. The pilot is attached to the rear of
the front burner. If needed, keep pressing ignitor button until
pilot lights.
Note:
If pilot does not stay lit, contact a qualified service
person or gas supplier for repairs. Until repairs are made,
light pilot with match. To light pilot with match, see Manual
Lighting Procedure.
9. Keep control knob pressed in for 30 seconds after lighting
pilot. After 30 seconds, release control knob.
• If control knob does not pop out when released, contact
a qualified service person or gas supplier for repairs.
Note:
If pilot goes out, repeat steps 4 through 8.
10. Slightly push in and turn control knob counterclockwise
to the ON position.
11. Press the on/off key on the remote control to turn on appli-
ance main burner. Wait at least 5 seconds before setting
desired flame height.
12. Press the up or down key until the small triangle is to the left
of large flame icon at the top of LCD display (see Figure 29).
Press the left or right key to set the desired flame height.
13. Replace control cover log (see Figure 26, page 15).
When the appliance and the remote control are switched off, the
house icon with the room temperature will be displayed. When
the remote control is turned on, other icons will be visible and
the main burner of the appliance will turn on.
1. Turn control knob clockwise to the ON position
(see Figure 25, page 15).
2. Press the ON button on remote control (see Figure 29). Wait
5 seconds to send a command to appliance.
Note:
An acoustic signal will be heard that confirms the recep-
tion of the command sent from the remote control.
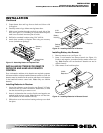
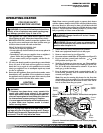
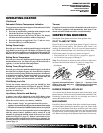
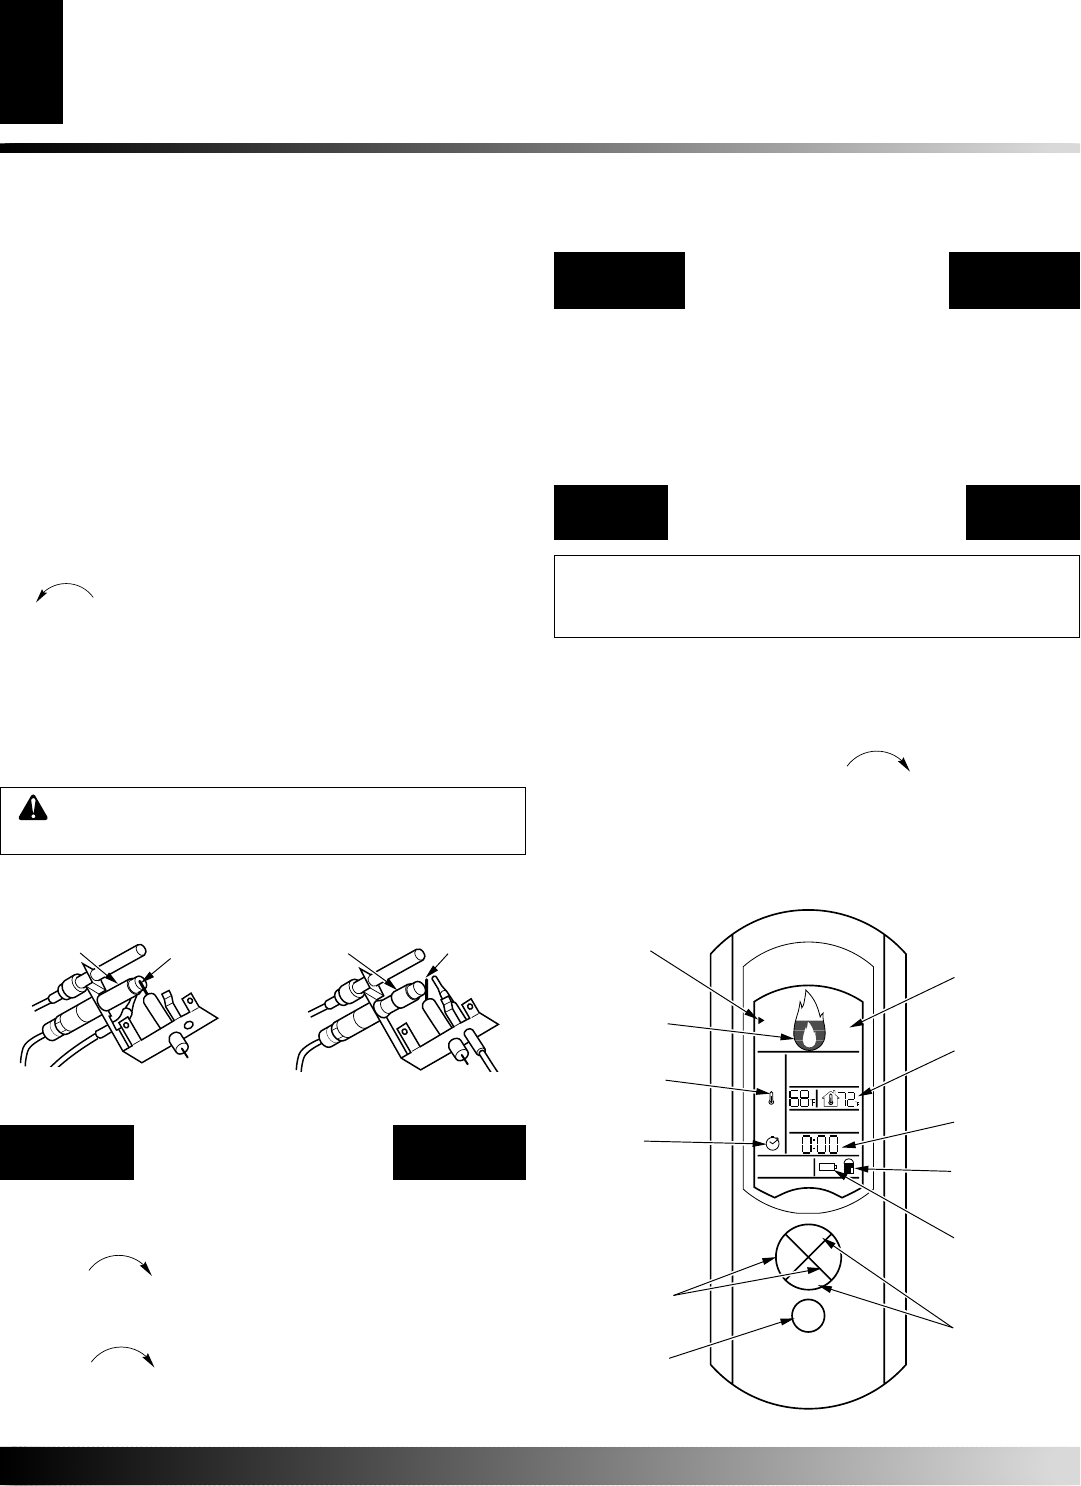
Left and Right
Keys Increase
and Decrease
Set Points
On/Off Button
Flame Height
Indicator
Thermometer
Icon
Clock Icon
Figure 29 - Remote Control
LCD Display
Room
Temperature
Display
(°F or °C)
Sleep Timer
Display
Up and Down
Keys Select
Available
Functions
Lock-Out
Indicator
Low Battery
Indicator
Small Triangle
Icon (Function
Indicator)