


www.desatech.com
111161-01H22
OPERATING HEATER
Continued
Manual Mode
1. Press the POWER and LOCK buttons
together to turn on the hand-held remote
control.
2. Press the MANU button to turn on the
replace.
3. Press the POWER and LOCK buttons
together to turn off the replace.
Auto (Thermostatic) Mode
1. Press the POWER and LOCK buttons
together to turn on the hand-held remote
control.
2. Press AUTO button to select this mode.
3. Set the desired room temperature by press-
ing the TEMP + or - buttons.
4. Press the POWER and LOCK buttons
together to turn off the replace
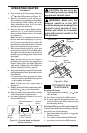
Note: Do not leave the hand-held remote in
the AUTO mode close to the replace. The
radiant heat from the replace will turn off the
replace. Ideally, place the hand-held remote
in the center of the room facing towards the
replace.
Note: Do not hold the hand-held remote for
a long time. Body temperature will affect its
operation in the AUTO mode.
Safety Features
When away from home for an extended period
of time or as a child safety feature to prevent
accidental ignition of the replace, the receiver
ON/OFF/REMOTE switch should be in the
OFF position.
Auto Shutoff Feature
1. If the average room temperature exceeds
82 degrees Fahrenheit (28 degrees Centi-
grade), the hand-held remote control will
perform a safety override and shut the
replace off. This feature is not available
in the MANU mode.
2. The receiver continuously receives signals
from the hand-held remote to control the
room temperature. If the hand-held remote
is misplaced, obstructed or for any reason
cannot transmit to the receiver, the receiver
will shut off the replace after 8 minutes.
This feature allows the user to lock/unlock
the keypad on the hand-held remote in the
MANU or AUTO mode to prevent inadvertent
operation (i.e. children operating the hand-held
remote control, etc.). The keypad is locked in
either on or off. Press the POWER and LOCK
buttons together to turn the unit on or off.
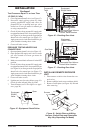
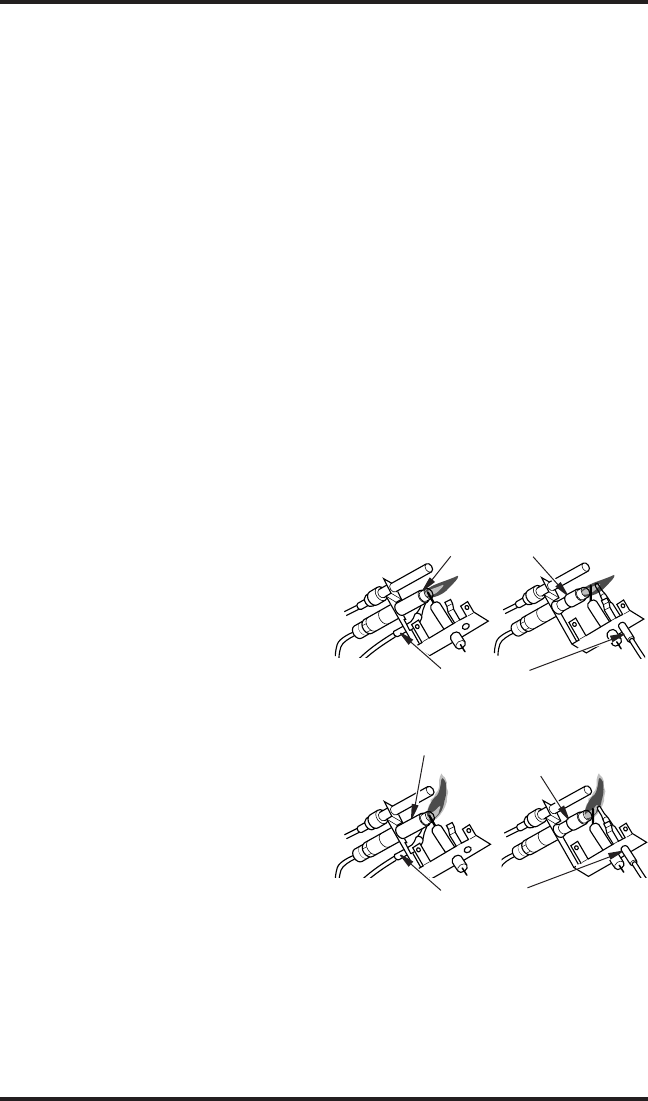
INSPECTING bURNERS
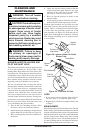
Check pilot ame pattern and burner ame pat-
terns often.
Figure 36 shows a correct pilot ame pattern.
Figure 37, shows an incorrect pilot ame pattern.
The incorrect pilot ame is not properly heating
the thermocouple. When the thermocouple cools,
the heater will shut down. If pilot ame pattern is
incorrect, as shown in Figure 37
• turn heater off (see To Turn Off Gas to Appli-
ance, page 20)
• see Troubleshooting, page 24
Note: The pilot ame on natural gas units will
have a slight curve, but the ame should be blue
and have no yellow or orange color.
Figure 36 - Correct Pilot Flame Pattern
Pilot Burner
Thermocouple
Figure 37 - Incorrect Pilot Flame Pattern
Natural Gas
Gas
Pilot
Burner
Thermocouple
Natural Gas
Gas
Pilot Burner