


8
901910
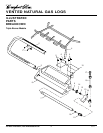
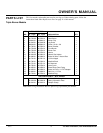
VENTED NATURAL GAS LOGS
For more information, visit www.desatech.com
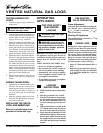
LIGHTING
INSTRUCTIONS
OPERATING
APPLIANCE
FOR YOUR SAFETY
READ BEFORE
LIGHTING
WARNING: If you do not fol-
low these instructions exactly, a
fire or explosion may result caus-
ing property damage, personal
injury or loss of life.
BEFORE LIGHTING smell all around
the appliance area for gas. Be sure to
smell next to the floor because some gas is
heavier than air and will settle on the
floor.
WHAT TO DO IF YOU SMELL GAS
• Do not try to light any appliance.
• Do not touch any electric switch; do
not use any phone in your building.
• Immediately call your gas supplier
from a neighbor’s phone. Follow the
gas supplier’s instructions.
• If you cannot reach your gas supplier,
call the fire department.
1. STOP! Read the safety information,
above.
2. Turn the gas shutoff valve to OFF.
3. Wait five (5) minutes to clear out any
gas. If you then smell gas STOP! Fol-
low the safety information above. If
you don’t smell gas, go on to the next
step.
4. Light a match and lay it on top of the
“U” shaped burner near the edge of
the cover on the right side of the pan.
5. Slowly turn the gas shutoff valve ON
until the burner ignites. If the burner
doesn’t ignite within 10 seconds with
the match burning, turn the shutoff
valve OFF and repeat steps 1 through
4 again.
WARNING: Keep flue open
when operating unit.
TESTING BURNER FOR
LEAKS
1. Generously apply soapy solution to all
connections.
WARNING: Never check for
gas leaks with open flame.
2. Light the burner with the shutoff valve
no more than half open and holding a
match slightly in front of the pan (see
Lighting Instructions, column 2).
3. Inspect all connections for bubbles, raw
gas odor, or flame from any area other
than the burner (leaks). If leaks are de-
tected, shut off the gas valve immedi-
ately. Tighten, or reassemble the loose
connection(s) using pipe joint com-
pound until burner system is leak free.
4. When the burner is tested and leak free,
observe the individual tongues of flame
on the burner.
Note:
The burner design
includes more ports on the outside of the
bar. Make sure that all ports are clear
and producing flame evenly across the
burner. If any ports appear blocked, clear
them by removing the burner manifold
and reaming the ports with a modified
paper clip or other suitable tool.
5. When finished testing, turn the gas
shutoff valve OFF to extinguish all
flames.
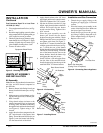
ADDING PAN MATERIAL
1. Open the bag of Ash Bed Material (ver-
miculite) and spread it evenly across
the burner pan to the top. You may over-
flow the front and sides of the pan to
cover the entire pan and connecting
hardware.
2. Open the glowing embers and evenly
cover the Ash Bed Material (vermicu-
lite) in the burner pan.
INSTALLING THE GRATE,
LOGS, AND EMBER BED
Refer to Log Installation sheet
provided in carton with logs.
GAS SHUTOFF
VALVE OPERATION
Flame Adjustment
Adjust the flame ON/OFF by turning the
gas shutoff valve counterclockwise
to open or clockwise to
close, as necessary.
Shutting Off Appliance
Turn gas shutoff valve clockwise
to the OFF position.
During the 2-3 hour appliance break-in
period, you may detect an odor from the
appliance as the various paints and com-
pounds used in the manufacturing of this
log set cure. This is a normal and tempo-
rary situation that is not cause for alarm.
However, you may want to provide extra
ventilation to the room during this time.
To ensure proper curing of the logs:
• Ignite a 2" flame and maintain it for 1
hour.
• Burn the logs in consecutive 1 hour pe-
riods raising the flame an additional
2" to full flame height for a total of
three hours.
CURING LOGS