


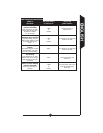

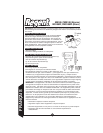

the junction box.
Step 3: Connect black wire to house black wire and con-
nect white wire to house white wire using wire nuts
provided.
Step 4: Attach fixture to the junction box with two screws
provided.
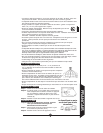
W
all Mount
Match up screws on the floodlight coverplate with
the junction box screw holes. (If necessary, lightly tap selected coverplate
holes with a hammer and screwdriver to open them.)
Attach fixture to junction box.
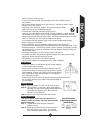
Ea
ve Mount
Loosen screw which connects sensor arm to coverplate
arm (I). Rotate coverplate arm upwards, allowing stop on
coverplate arm to clear stop on sensor arm. NOTE: Once
stop on coverplate arm is above (to the left of) stop on
sensor arm, tighten screw. Be careful not to break stops.
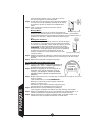
Step 5: Apply silicone caulking around the edges of coverplate
and in any open screw holes for a watertight seal.
Step 6: Turn power on at main fuse/breaker box.Ho
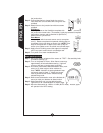
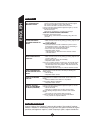
How to operate your fixtrue
Step 1: Move slide switch on bottom of the sensor to “TEST”. Set sensitivity knob
to medium (halfway) (J).
Step 2: Turn on the power to fixture. Allow fixture to warm up
approximately 40 seconds before testing. (Light will
come on and stay on during warm-up period.)
Step 3: Aim sensor head toward desired detection area, main-
taining a 15° down angle to allow moisture to
drain. NOTE: Maintain air spacing between lamp
and sensor head, at least 1”. Make sure sensor
head is positioned with control switches facing
towards the ground.
Step 4: Walk across the detection zone at the farthest dis-
tance you wish your detector to detect motion.
Step 5: Adjust sensitivity until you get desired results.
Light will turn off 4 seconds after all motion stops.
Step 6: Move the slide switch to 4 MIN or 12 MIN (AUTO mode). At dusk, lights
will operate in the AUTO setting.
4
ENGLISH
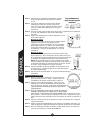
H
(wall mount)
I
(eave mount)
THIS IS THE
BOTTOM SIDE
OF THE MOTION
DETECTOR
J
TEST
4 MIN
12 MIN
SENSITIVITY