


4
ENGLISH
4. Connect white fixture wire to white supply wire (neutral). Secure with wire nut
(not provided).
5. Be careful to connect the wires correctly. Make sure no bare strands of wire
extend from the wire nut or other approved wire connectors (not supplied).
A
A
t
t
t
t
a
a
c
c
h
h
i
i
n
n
g
g
a
a
c
c
c
c
e
e
s
s
s
s
c
c
o
o
v
v
e
e
r
r
a
a
n
n
d
d
l
l
e
e
n
n
s
s
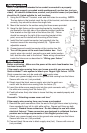
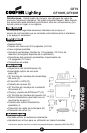
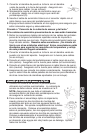
1. Attach the access cover to the light fixture using screws provid-
ed. Access cover should be positioned as shown in P.
NOTE:
Make sure all wiring is inside of the fixture arm before the
access cover is secured.
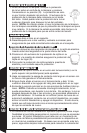
2. To attach the optical assembly to the housing, first insert the
three lens assembly mounting screws into the three holes
inside the fixture. Do not fully tighten the screws at this point.
Position the optical assembly over the fixture with slotted holes
over the mounting screws (Q). Carefully seat the optical assem-
bly over the mounting screws and rotate the optical assembly
clockwise until it stops. Tighten all screws.
I
I
n
n
s
s
t
t
a
a
l
l
l
l
i
i
n
n
g
g
t
t
h
h
e
e
l
l
i
i
g
g
h
h
t
t
s
s
h
h
i
i
e
e
l
l
d
d
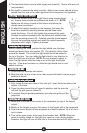
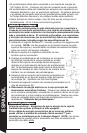
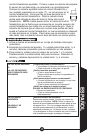
Before installing the lamp, position the light shield over the lamp
socket and press firmly into position (R). The shield is friction fitted
around the socket. The end of the light shield should be seated in
the lip of the lens. You can rotate the light shield in any direction to
block the light from the fixture.
NOTE: Do not attempt to adjust or
touch the light shield while the lamp is on as the light shield gets
very hot. If the lamp has been on, allow the light shield time to cool
before touching.
I
I
n
n
s
s
t
t
a
a
l
l
l
l
i
i
n
n
g
g
t
t
h
h
e
e
l
l
a
a
m
m
p
p
1. Screw the bulb securely into socket.
2. Back the bulb out one or two turns, then screw bulb back to insure proper
position in socket.
I
I
n
n
s
s
t
t
a
a
l
l
l
l
i
i
n
n
g
g
t
t
h
h
e
e
w
w
i
i
r
r
e
e
g
g
r
r
i
i
l
l
l
l
g
g
u
u
a
a
r
r
d
d
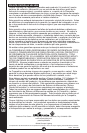
1. First, locate the two wire tabs on the wire grill. Insert these two tabs in the
bottom of the lens.
2. Press the other end of the grill guard in position, and the wire clip
will lock the grill guard in place (S).
3. To remove the grill guard squeeze the wire clip and gently pull the
guard out.
I
I
n
n
s
s
t
t
a
a
l
l
l
l
i
i
n
n
g
g
t
t
h
h
e
e
l
l
i
i
g
g
h
h
t
t
s
s
e
e
n
n
s
s
o
o
r
r
1. Make sure the screw in the center of the receptacle (on top of the fixture)
is tight.
2. Match up the largest prong on the sensor to the largest slot in the receptacle.
3. Push the sensor down into the receptacle and twist clockwise 1/4 of a turn to
lock in place.
4. T
urn on the main power at the main fuse/breaker box.
NOTE: When the
power is initially turned on, the light may come on, even during daylight.
However, the light will turn off after two or three minutes and will only come on
P
Q
R
S