


3
ENGLISH
P
P
u
u
t
t
t
t
i
i
n
n
g
g
u
u
p
p
y
y
o
o
u
u
r
r
f
f
i
i
x
x
t
t
u
u
r
r
e
e
NOTE: This fixture is intended to be conduit connected to a properly
installed and properly grounded metal weatherproof junction box (not pro-
vided). All conduit connections, conduit, and junction boxes (not provided)
should be UL Listed suitable for wet locations.
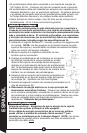
1.
Using the EZ-Mount™ bracket, mark and drill holes for mounting. NOTE:
The two holes in the bracket mark the top of the bracket, and when mounted
correctly, they should be above the single hole.
2. Mount the bracket to the surface using the three screws provided.
3. Hang the light fixture on the mounting bracket by inserting the
pin located on the right side of the mounting bracket inside the
hole located on the right side of the fixture arm (M). Fixture
should be swung to the right of the mounting bracket at this
point, so as not to interfere with the wiring of the fixture.
4. Install the first conduit connector (not provided) into the
knockout area of the mounting bracket (N). Tighten with
adjustable wrench.
5. Connect second conduit connector at the junction box (N).
6. Turn off the power at the main fuse/breaker box. Feed
supply wires into conduit, connecting one end inside junction
box, and the other end to the fixture. Make wiring connections
inside the fixture arm as described in
“Wiring your fixture.”
W
W
i
i
r
r
i
i
n
n
g
g
y
y
o
o
u
u
r
r
f
f
i
i
x
x
t
t
u
u
r
r
e
e
Before continuing - Make sure the power at the main fuse/breaker box
has been turned off.
If the supply wires coming from your house are solid, you can use the
Quick-connect™ wire system to attach your Regent light fixture. NOTE:
Quick connectors can only be used with solid supply wires.
1. Attach your ground supply wire to the ground wire coming from the fixture.
Secure with wire nut. (not provided)
2. Simply insert the black source supply wire into the quick con-
nector with the black wire coming from the fixture (O).
3. Insert the white source supply wire into the quick connector with
the white wire coming from the fixture (O).
4. Push both wires firmly into holes to insure that they are seated properly and
securely.
Proceed to “Attaching access cover and lens.”
If the supply wires coming from your house are stranded:
1.
Remove the quick connectors from the end of the light fixture wires by turning
them repeatedly from left to right while pulling. Repeat until they are both
removed.
Discard these connectors. Do not attempt to use with other
electrical fixtures! These connectors are designed to withstand the tem
-
perature and voltage requirements of this Regent product only.
2.
Attach your ground supply wire to the ground wire coming from the fixture.
Secure with wire nut. (not provided)
3. Connect black fixture wire to black supply wire (hot). Secure with wire nut
(not provided).
M
N
O