


4
ENGLISH
Step 7: Attach copper (or green) colored ground wire (coming from the fixture coverplate) to
house ground wire using wire nuts provided.
Step 8: Remove fixture from hook and discard hook. Attach fixture to the mounting bracket
using the center bolt provided. Insert plastic color matched plug in center bolt hole for
finished appearance.
Step 9: Apply silicone caulking around edges of coverplate and in any open holes to provide a
watertight seal from rain and moisture.
Step 10: Turn power on at main fuse/breaker box.
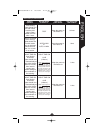
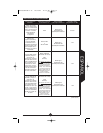
How to operate your fixture
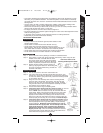
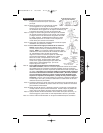
Step 1: Move slide switch on bottom of the sensor to “TEST”.
Set sensitivity slide switch to medium or “M” (O).
Step 2: Turn on the power to fixture. Allow fixture to warm up
approximately 90 seconds before testing. (Lights may
or may not come on during warm-up period, this is
normal.)
Step 3: Aim sensor head in desired position. NOTE: Maintain
air spacing between lamps and sensor head, at least
1”. Make sure sensor head is positioned with control
switches facing towards the ground.
Step 4: Walk across the detection zone at the farthest distance
you wish your detector to detect motion.
Step 5: Adjust sensitivity until you get desired results. For
more range, aim sensor head slightly upwards. For
less range, aim sensor head slightly downward. Lights
will turn off 4 seconds after all motion stops.
Step 6: Move slide switch to 4 MIN or 12 MIN (AUTO mode), or to one of the three “NIGHT
TIME ON” settings. At dusk, lights will operate in the AUTO or Night Time On
settings.
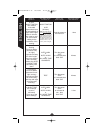
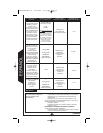
Installing your light switch cover
This cover will only
fit standard residential light switch toggles up to 1/4” wide. The light
switch cover prevents children and adults from accidentally turning off the power to this
motion light fixture. By inadvertently turning off the power, the mode of operation may be
changed. If the mode of operation needs to be changed, just flip up the light cover to find a
helpful guide at your fingertips with quick and easy instructions which will allow you to
select the mode of your choice. NOTE: The modes of operation ONLY apply to this
light.
Step 1: Turn off the power at the main fuse/breaker
box.
Step 2: Locate the inside light switch that will control
your motion
activated light.
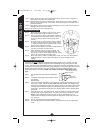
Step 3: If you have a single light switch, remove the two screws that are holding your cur-
rent cover in place. NOTE: DO NOT REMOVE THE COVER. The Regent light
switch cover is designed to fit over your existing cover! If you have a bank of light
switches (several switches together), locate the one switch that will control your
motion light. Remove the two screws, one directly above and one directly below
the switch.
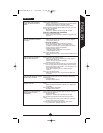
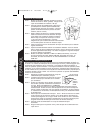
Step 4: Open the lid on your light switch cover. Align the holes on the light switch cover
over the holes in your current cover. Re-insert the screws to secure it in place.
NOTE: If your screws are not long enough, it may be necessary for you to
replace them with longer screws to secure the light switch cover over your exist-
ing cover (R).
Step 5: Turn on the power at the main fuse/breaker box.
Step 6: Turn the light switch to the “ON” position and close the lid on your light switch
cover.
TEST
4 MIN
M
12 MIN
2 HR
H
L
MODE
AUTO
SENSITIVITY
NIGHT TIME ON
6 HR
O
4 HR
Do not remove your
current cover.
Place over
existing cover
SV278/SV278W I.S. 10/21/03 11:12 AM Page 4