


18-29
Cisco Signaling Gateway Manager User Guide
OL-5742-01
Chapter 18 Configuring SGM Security
Implementing SSL Support in SGM
• To use an existing signed key/certificate pair, log in as the root user on the
SGM server and enter the following command:
# ./sgm keytool import_key key_filename cert_filename
where key_filename is the name of the existing SSL key and cert_filename is
the name of the existing signed certificate.
SGM stops the SGM server and imports the SSL key in OpenSSL format and
the signed SSL certificate in X.509 format.
Step 3 Enable SSL support in SGM, by logging in as the root user on the SGM server and
entering the sgm ssl enable command.
Step 4 Set up the SGM client-side SSL certificate trust relationship, by downloading and
importing the self-signed or CA-signed certificate on every remote SGM client,
Windows as well as Solaris, that connects to the SGM server.
a. (Self-signed certificate only) Download the self-signed certificate
(server.cer), using the procedure in the “Downloading the SGM Server’s
Self-Signed SSL Certificate” section on page 18-30.
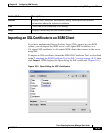
b. Import the self-signed or CA-signed certificate, using the procedure in the
“Importing an SSL Certificate to an SGM Client” section on page 18-33.
Step 5 Restart the SGM client.
The SGM clients can now connect to the SGM server using SSL. All
communication between the server and clients is encrypted.
If an SGM or GTT client that is not SSL-enabled attempts to connect to an
SSL-enabled SGM server, SGM displays an appropriate warning message and
opens the SGM client download page. The user can then download and install a
new SGM client to use to connect to that SGM server.
If the client is SSL-enabled but does not have the correct certificate, SGM
displays an appropriate warning message and opens the SGM Server SSL
Certificate page. The user can then download the signed SSL certificate in X.509
format to the client.