


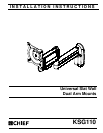


Installation Instructions KSG110
5
INSTALLATION
WARNING: FAILURE TO PROVIDE ADEQUATE
STRUCTURAL STRENGTH FOR THIS COMPONENT CAN
RESULT IN SERIOUS PERSONAL INJURY OR DAMAGE
TO EQUIPMENT! It is the installer’s responsibility to make
sure the structure to which this component is attached can
support five times the combined weight of all equipment.
Reinforce the structure as required before installing the
component.
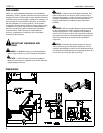
1. Install the slat wall bracket (B) following the instructions
included with kit.
IMPORTANT ! : If the display being installed has a recessed
mounting surface, the display must be assembled to the mount
prior to mount installation. See Display Installation in this
document before proceeding.
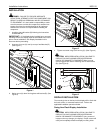
2. Insert top of mount (A) over lip on top of wall bracket (B).
(See Figure 1)
Figure 1
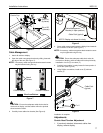
3. Swing mount (A) down flush against wall bracket (B). (See
Figure 2)
Figure 2
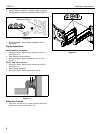
4. Tighten set screw using 5/32" hex key (D). (See Figure 3)
CAUTION: IMPROPER INSTALLATION CAN LEAD TO
DISPLAY FALLING CAUSING SERIOUS PERSONAL
INJURY OR DAMAGE TO EQUIPMENT! Make sure set
screw engages back side of mounting dish on wall bracket
(B). (See Figure 3)
Figure 3
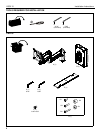
DISPLAY INSTALLATION
The mounting holes on the back of the display will be flush with
the back surface, or recessed into the back. Refer to the
applicable installation procedure below.
Swing Arm Flush Display Installation
CAUTION: IMPROPER INSTALLATION CAN LEAD TO
DISPLAY FALLING CAUSING SERIOUS PERSONAL
INJURY OR DAMAGE TO EQUIPMENT! Using screws of
improper size may damage your display! Proper screws will
easily and completely thread into display mounting holes.
B
A
2
B
A
3
B
A
4