12
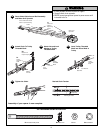
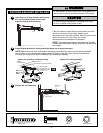
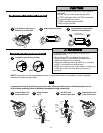
Remove
2 x 4
Close door
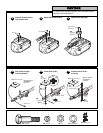
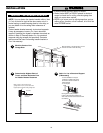
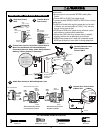
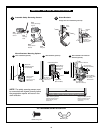
Attach Hanging Brackets to Ceiling and Fasten Motor Unit to Hanging Brackets
Remove 2x4 and Close Door
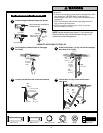
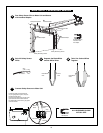
C9 Hex Bolt C4 Nut C5 Lock Washer C8 Lag Screw
ALL HARDWARE SHOWN ACTUAL SIZE
2 x 4
If the top section or panel hits the trolley when you raise
the door, pull down on the trolley release arm to
disconnect inner and outer sections. Slide the outer trolley
toward the motor unit. The trolley can remain
disconnected until installation is completed.
NOTE: The garage door opener motor head will typically
sit lower than the header bracket, therefore, the rail will be
at an angle.
Open Door to Full Open Position and Rest Rail
on a 2x4 to Position Opener at the Proper
Angle for Hanging from the Ceiling
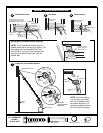
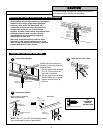
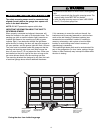
POSITION AND HANG MOTOR UNIT
NOTE: Before the motor unit is secured to the ceiling, insure that the motor unit and rail are centered
over the door. If you mounted the header bracket off center, hang the motor unit the same distance.
Concrete anchors must be used if installing any brackets into masonry.
Measure
Distance
C8 Lag Screws
C9 Hex Bolt
C5 Lock Washer
C4 Nut
Bracket
(Not Provided)
(Not Provided)
Bolt 5/16"-18 x 7/8"
Lock Washer 5/16"
Nut 5/16" - 18
C9 Hex Bolt
C5 Lock Washer
C4 Nut
C8 Lag Screws or
Concrete Anchors (Not Provided)
Option with unfinished ceiling
Option with finished or unfinished ceiling
OR
1
2
3
To prevent damage to garage door, rest garage door opener
rail on 2 x 4 placed on top section of door.
WARNING
CAUTION
WARNING
WARNING
To avoid possible SERIOUS INJURY from a falling garage door
opener, fasten it securely to structural supports of the garage.
WARNING
CAUTION
WARNING
WARNING


