


5-en
Program your Keyless Entry
Activate the opener only when door is in full view, free of
obstruction and properly adjusted. No one should enter or leave
garage while door is in motion. Do not allow children to operate
push button(s) or remote(s). Do not allow children to play near
the door.
NOTE: Your new Keyless Entry must be programmed to operate your
garage door opener.
Program the Receiver to Match Additional Remote Control Code
Using the orange “LEARN” Button:
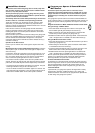
1. Press and release the orange “learn” button (1) on opener. The
learn indicator light will glow steadily for 30 seconds.
2. Within 30 seconds, enter a four digit personal identification number
(PIN) of your choice on the keypad (2), then press and hold the
ENTER button.
3. Release the button when the opener light blinks (3). It has learned
the code. If the light bulb is not installed, two clicks will be heard.
NOTE: This method requires two people if the Keyless Entry is already
mounted outside the garage.
Using the Multi-Function Door Control:
1. Enter a four digit personal identification number (PIN) of your choice
on the keypad, then press and hold ENTER.
2. While holding the ENTER button, press and hold the LIGHT button
on the Multi-Function Door Control.
3. Continue holding the ENTER and LIGHT buttons while you press
the push bar on the Multi-Function Door Control (all three buttons
are held).
4. Release buttons when the opener light blinks. It has learned the
code. If the light bulb is not installed, two clicks will be heard.
23
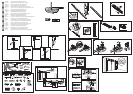
Using the Wall-Mounted Door Control
THE MULTI-FUNCTION DOOR CONTROL
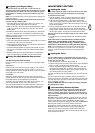
Press the push bar (1) to open or close the door. Press again to stop
the door.
Light feature
Press the Light button (2) to turn the opener light on or off. It will not
control the opener light when the door is in motion. If you turn it on
and then activate the opener, the light will remain on for 2-1/2 minutes.
Press again to turn it off sooner.
Lock feature
Designed to prevent operation of the door from hand-held remote
controls. However, the door will open and close from the Door Control,
the Outside Keylock and the Keyless Entry Accessories.
To activate, press and hold the Lock button (3) for 2 seconds. The
push bar light will flash as long as the Lock feature is on.
To turn off, press and hold the Lock button again for 2 seconds.The
push bar light will stop flashing. The Lock feature will also turn off
whenever the “LEARN” button on the opener panel is activated.
24
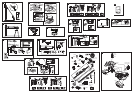
ADJUSTMENT SECTION
Setting the Limits
Travel limits regulate the points at which the door will stop when
moving up or down. Follow the steps below to set the limits.
To program the travel limits:
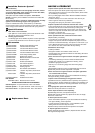
1. Open the light lens. Press and hold the black button (1) until the
yellow indicator light (3) starts flashing slowly and then release.
2. Push and hold the black button (1) until the door reaches the
desired open position. Adjust the position of the door by using the
black (1) and orange (2) buttons. Black moves the door UP, orange
moves the door DOWN.
3. Push the programmed remote control (4) or push bar on the door
control that was shipped with your opener. This sets the full UP
(open) position. The door will travel to the floor and reverse back to
the UP (open) position. The opener has learned its travel limits.
Check to be sure the door is high enough for your vehicle. Adjust
if necessary.
4. The indicator light (3) will stop flashing when the limits have been
learned.
If the door stops or reverses before it reaches the floor
repeat steps 1-3 immediately. If this does not set the
limits, proceed to #15 of the Having a Problem? section
and follow the instructions for setting the limits manually.
NOTE: The worklight blinks 11 times whenever the Limits Setting
routine fails. If you get this error, proceed to #15 of the Having a
Problem? section and follow the instructions for setting the limits
manually.
25
Setting the Force
The force setting button is located behind the light lens of the
opener. The force setting regulates the amount of power required
to open and close the door.
1. Open the light lens. Locate the orange button (2).
2. Push the orange button (2) twice to enter unit into Force Adjustment
Mode. The LED (3) (indicator light) will flash quickly.
3. Push the programmed remote control (4) or push bar on the door
control that was shipped with your opener. The door will travel to
the DOWN (close) position. Push the remote control (4) again, the
door will travel to the UP (open) position.
The LED (3) (indicator light) will stop flashing when the force has been
learned.
The door must travel through a complete cycle, UP and DOWN, in
order for the force to be set properly. If the unit cannot open and close
your door fully, inspect your door to insure that it is balanced properly
and is not sticking or binding.
The force MUST be learned in order to properly complete
the setting of the limits.
26
Test the Safety Reverse System
The safety reverse system test is important. Garage door must
reverse on contact with a 50mm obstacle laid flat on the floor.
Failure to properly adjust opener may result in serious personal
injury from a closing garage door. Repeat test once a month and
adjust as needed.
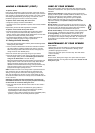
Procedure: Place a 50mm obstacle (1) laid flat on the floor under the
garage door. Operate the door in the down direction. The door must
reverse on the obstruction. If the door stops on the obstruction,
remove obstruction and repeat Setting the Limits step 25. Repeat test.
When the door reverses on the 50mm obstacle, remove the
obstruction and run the opener through a complete travel cycle. Door
must not reverse in closed position. If it does, repeat Setting the
Limits and Force steps 25 and 26 and repeat safety reverse test.
Place 20kg at the center of the door and ensure that the door will not
move up more than 500mm.
27