


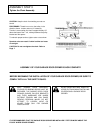
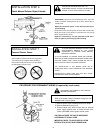
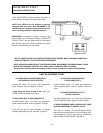

Install Multi-Function Door Control Panel
Models 1160 and 1150 ONLY
There are 4 screw terminals on the back of the Multi
Function Control. Connect bell wire by color; yellow
to yellow, white to white, red to red and black to black.
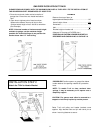
Install the Multi-Function Control on an inside garage wall as
shown. Use anchors if installing into drywall a convenient place is
alongside the service door.
LOCATE OUT OF THE REACH OF CHILDREN.
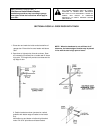
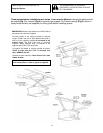
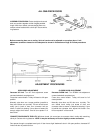
Run bell wire up the wall and across the ceiling to opener. Secure
with insulated staples.
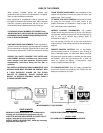
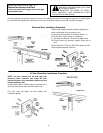
Receiver terminals and antenna are Located on back panel of
opener. Position antenna wire as shown. Then connect the wire by
color to the red, white, black and yellow opener terminal screws.
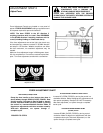
OPERATION OF THE
MULTI-FUNCTION CONTROL PANEL
DOOR CONTROL PUSH BUTTON
Press to open or close door. Press again to REVERSE door
during CLOSING cycle or to STOP door while OPENING.
LOCK SWITCH: Activate ONLY when door is closed. The
LOCK Switch is designed to prevent operation of door from
portable remote control transmitters. Door will OPEN from Door
Control Button, Key Switch and Keyless Entry Systems. Door
will CLOSE if door control button is pressed and held until the
door closes fully. If button is released before down travel is
completed, door will reverse.
TO ACTIVATE: Press Lock Switch button. Indicator light will
turn ON. TO TURN OFF: Press Lock Switch button again.
Indicator light will turn OFF. Normal operation will
LIGHT SWITCH
TO ACTIVATE: Press Light Switch button. Indicator light will
turn ON. Opener light will turn on (or remain on if opener is still
in 41/2 minute automatic cycle). TO TURN OFF: Press Light
Switch button again. Opener light will turn OFF.
NOTE: To turn light OFF during 4-1/2 minute automatic
cycle, press Light Switch button twice • to activate and
then to turn off Light Switch Feature. Light will turn OFF
immediately.
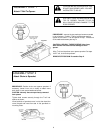
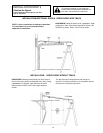
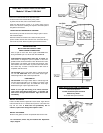
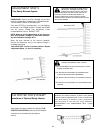
INSTALL THE LIGHTS
Install a 75 Watt maximum light bulb in each socket. Lights will turn
ON and remain lit for 4-1/2 minutes when power is connected. Then
they will turn OFF. If bulbs burn out prematurely due to
vibration, replace with "Garage Door Opener" bulbs.
INSTALL THE LENSES
Slide lens into guides as shown. Snap bottom tabs into lens slots.
For convenience, lenses may be installed after Adjustment
Step 3, Page 22.
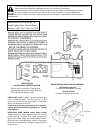
WIRING INSTRUCTIONS FOR ACCESSORIES
The Protector System
To white and black opener terminals
Outdoor Key Switch:
To red and white opener terminals
15