


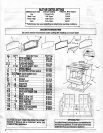
8
INSTRUCTIONS FOR FIRST BURN - CURING THE STOVE PAINT
Your stove has been painted with the highest quality stove paint and has special break-in procedures. The
heat generated by the normal operation of the stove, will serve to harden the paint.
Ventilate the house during the first three times the stove is used. The paint on the stove will give off smoke,
carbon dioxide and an odor. Without adequate ventilation, concentrations of smoke could irritate, or be
upsetting. Open doors and windows and use a fan if necessary. After the initial burns the paint will be
cured and there should be no more smoke.
Each of the initial burns should be conducted as follows:
A) The first and second burns should be at approximately 250 deg F (120 deg C) for approximately 20
minutes.
B) The third burn should be between 500 deg F (260 to 370 deg C) for at least 45 minutes. The important
fact is the paint should be cured slowly. Avoid hot fires during the curing process.
During the curing process the paint will be gummy. Once cured the paint will remain hard.
It is normal to see flat spots on painted surfaces of the stove. The flat spots on the paint surface indicate
the hotter surfaces of the stove, and is caused by the heat radiating through the paint.
It is also expected that shiny spots caused by friction from the packaging materials, will disappear during
the curing of the stove.
SO:
1) Remember to Ventilate well.
2) Allow the stove to cure before burning for long periods at high temperatures.
3) Flat spots on the painted surfaces are normal.
4) Shiny spots on the paint surface before burning is normal.
5) Call your dealer if you have any questions.
BUILDING A FIRE
1. Open inlet air control fully.
2. Place a small amount of crumpled paper in the stove.
3. Cover the paper with a generous amount of kindling in a teepee fashion and a few small pieces of
wood.
4. Ignite the paper and close door. If fire dies down substantially, open door slightly.
5. Add larger pieces of wood as the fire progresses being careful not to overload. Do not fill firebox
beyond firebrick area. An ideal coal bed of 1" to 2" should be established to achieve optimum
performance.
6. This unit is designed to function most effectively when air is allowed to circulate to all areas of the
firebox. An ideal means of achieving this is to rake a slight (1" to 2" wide) trough in the centre of the
coal bed from front to back prior to loading the fuel.
7. Once fuel has been loaded, close door and open air inlet control fully until fire is well established
(approx. 10 minutes) being careful not to overfire.
8. Readjust air inlet control to desired burn rate. If excessive smoke fills firebox, open air inlet control
slightly until flames resume and wood is sufficiently ignited. While a basic rule of thumb is “closed -
low”, “1/2 way - medium” and “fully open - high” more information may be available on the insert sheet
relating to your specific unit.
9. When refuelling, adjust air control to the fully open position. When fire brightens, slowly and carefully
open the door. This procedure will prevent gases from igniting causing smoke and flame spillage.
10. Add fuel being careful not to overload.