


11
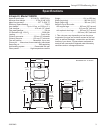
Intrepid II Woodburning Stove
30003840
Clean the Griddle Before Use
At the factory the griddle is coated with vegetable oil to
prevent rusting while the stove is in transit and storage.
Remove the oil with a dry rag or paper towel before you
use the stove.
Set Up the Stove
Remove any loose parts from inside the stove. Place a
protective pad on the floor, arrange some sections of 4
x 4 lumber on the pad for support, and carefully tip the
stove onto them, on its back.
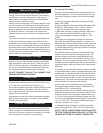
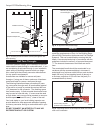
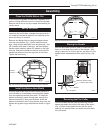
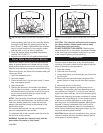
Remove and discard the four large slot-head screws
from the stove bottom (Fig. 13) and install the stove
legs, using the hex head bolts from the parts bag. Use
3/8” washers with three of the legs; the door/damper
handle holder installs in place of a washer on the right
front leg. Position the holder so the hole to accept the
handle nub faces out from the right side of the stove.
Tighten the bolts firmly.
Assembly
ST513
Remove leg bolts
11/00
Slotted
Screws
ST513
Fig. 13 Remove the slotted screws from the stove bottom.
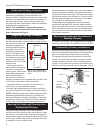
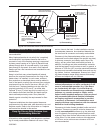
Install the Bottom Heat Shield
A bottom heat shield must be used unless the stove is
to be situated on a completely noncombustible hearth,
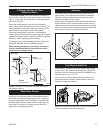
such as unpainted concrete over earth. To install the
bottom heat shield, loosen the leg bolts, and slip the
bottom heat shield C-clips onto the bolts. Attach the
bottom heat shield to the C-clips with the wing nuts, and
tighten the leg bolts. Align the shield as shown in Figure
14.
10³⁄₄"
9³⁄₄"
ST512
Attach
bottom heat
shield
11/00
ST512
Fig. 14 Attach bottom heat shield.
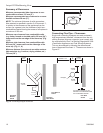
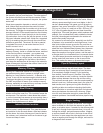
Storing the Handle
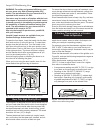
Use the removable handle to open or close the front
doors, or to change the position of the damper. After
using it, remove it so it won’t get hot, and store it in the
handle holder installed behind the right front leg. (Fig.
15)
ST514
Bottom heat shield
& clips
11/00
Door Handle Holder
Bottom Heat Shield
Bracket
Wing Bolt
ST514
Fig. 15 Handle holder and heat shield positions.
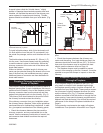
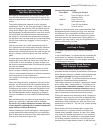
Reversing the Flue Collar
You can reverse the flue collar by removing the two
screws that attach the collar to the back of the stove.
(Fig. 16) Be sure the gasket around the flue collar
opening is in position when you screw the collar back
on to the stove.