


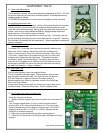

B) Water Inlet Valve Test
Turn power OFF. If the water level rises inside a partially filled tank, the
Water Inlet Valve is leaking. Disconnect wires from the Water Inlet
Valve coil and connect a 2 wire line cord to the terminals. Plug it into a
115V outlet. If water flows in and stops when you pull it out, the Valve
is working fine. Repeat this test a few times. The problem may be in
the Probe or Water Level Control Board. If the water does not flow in
when the cord is plugged into an electrical outlet, the Solenoid coil may
be damaged, opened or the valve may have an obstruction preventing
the water from flowing in. Clean or replace it.
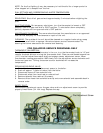
DUAL PROBE
HOSE NUT ASSY
WATER INLET VALVE
C) Dual Probe Test
If lack of water persists, check the probe as follows:
Turn on the power and water supply. Check inside the tank to make
sure the water is below the Probe. Pull the BLUE wire and terminal
OFF the Probe rod. If water still does not flow after the wire is
disconnected from the Probe, the problem may be in the Solid State
Dual Level Control Board.
If water starts flowing into the tank, the Probe may be grounded, due to
excessive liming. Check with Ohm meter. Clean or replace probe.
D) Dual Probe Liquid Level Controller Test
Check the Controller as follows:
1. Make sure there is power input to the Controller at the terminals AC1
& AC2
Your voltmeter should read 115 Volts. It should read the same at
terminals AC1 & FILL when the water level is low. This is the output
power to actuate the coil of the Solenoid Valve to open it. The lack of
voltage at terminals AC1 & L-LEVEL or H-LEVEL indicates that the
Controller is not working properly.
2. Make sure all wire connections are tight, including ground.
3. If after this, the Controller is still failing to open the Water Inlet Valve,
replace it.
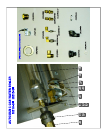
BLUE
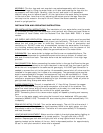
A) Thermostat Adjustments:
The Thermostat is factory set for proper dispense temperature of 200°F ± 3°F with
the control knob set to the maximum clockwise position. If field adjustments are
needed proceed as follows:
To DECREASE temperature, turn the control knob slightly counter-clockwise.
For qualified technicians ONLY:
To INCREASE the water temperature - With the Thermostat Knob to its maximum
clockwise position, remove the knob and locate the slotted adjustment screw
inside the hollow thermostat shaft, Note: glyptal may need to be removed to gain
access, then using a narrow-bladed screwdriver, engage slotted adjustment
screw and turn it ¼ turn slowly counter-clockwise.
Allow a few minutes for the temperature to reach set level. The Heater Light will
go ON, indicating the heating element is activated, wait for it to go OFF, indicating
that the water has reached new set temperature. Take a temperature reading and
repeat if necessary.
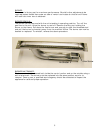
THERMOSTAT
COMPONENT TESTS
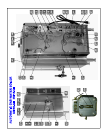
DUAL PROBE CONTROLLER
- CCW - DECREASES
TEMPERATURE
ADJUSTMENT
SCREW